Running MPI Applications in Containers: An OpenFOAM Example
Overview
Teaching: 45 min
Exercises: 40 minQuestions
How can an MPI application packaged in a container run across HPC compute nodes?
How are host MPI and interconnect libraries made available inside a container?
What performance overhead can MPI containers introduce compared with native execution?
Objectives
Run a containerised MPI application using Singularity and the Slurm scheduler.
Explain how Slurm launches containerised MPI applications to run in parallel.
Describe the roles of the host and container MPI installations in the hybrid MPI model, and why MPI ABI compatibility and access to host interconnect libraries are required.
Identify how Pawsey’s MPI-enabled Singularity module configures host integration.
Request a new interactive allocation
If you’re running this tutorial on a shared system (e.g. Setonix at Pawsey), you should use one of the compute nodes rather than the login node. You can do this by requesting an interactive allocation from the scheduler, for instance on Setonix with Slurm (do this if you are not in an salloc interactive session yet):
$ salloc -N 1 -n 1 -c 8 --reservation=ContainersTraining -t 4:00:00
salloc: Granted job allocation 3453895
salloc: Waiting for resource configuration
salloc: Nodes nid000152 are ready for job
Prepare for the hands-on exercise
Before we start, let us ensure that we have the files required for this tutorial.
If you haven’t done so already, move to a suitable working directory and download the following GitHub repository. On Pawsey systems, use your scratch directory; on other HPC or cloud systems, use the equivalent working directory recommended by the system administrators.
$ cd "$MYSCRATCH"    # On Pawsey systems
$ git clone https://github.com/PawseySC/singularity-containers
$ export TUTO="$PWD/singularity-containers"
Now move to the working directory for this episode:
$ cd "${TUTO}/demos/openfoam"
$ pwd
The working directory should be something like:
/path/to/your/scratch/singularity-containers/demos/openfoam
Load the Singularity module, using Pawsey’s MPI-enabled flavour:
$ module load singularity/4.1.0-mpi
Choose an OpenFOAM image from Pawsey’s Quay registry
In your web browser, go to: https://quay.io/pawsey.
Pawsey provides container images for several research applications. Find and select the pawsey/openfoam repository, then select the Tags icon on the left side of the page. (Do not confuse this repository with pawsey/openfoam-org.)
Find the OpenFOAM image with the tag v2606-gcc13DPInt32Opt-mpich3.4.3-ubuntu24.04.
To avoid errors typing the image tag, select the Fetch Tag icon on the right, then select Docker Pull (by tag). Copy only the image tag, not the complete Docker command, and close the window. We’ll use that tag for the pulling command in the next section.
Pull the OpenFOAM image into your local image library
In the terminal running within the interactive allocation on Setonix, define your local Singularity image library directory and create it if it does not already exist:
$ export MY_LOCAL_LIBRARY="${MYSOFTWARE}/singularity/images"
$ mkdir -p "$MY_LOCAL_LIBRARY"
Pull the image for this example into your local image library:
$ singularity pull \
  "${MY_LOCAL_LIBRARY}/openfoam--v2606-gcc13DPInt32Opt-mpich3.4.3-ubuntu24.04.sif" \
  docker://quay.io/pawsey/openfoam:v2606-gcc13DPInt32Opt-mpich3.4.3-ubuntu24.04
Retrieving the Docker/OCI image content and converting it into a SIF image may take a few minutes.
If the OpenFOAM image already exists
You may see an error similar to:
FATAL: Image file already exists: "..../openfoam--v2606-gcc13DPInt32Opt-mpich3.4.3-ubuntu24.04.sif" - will not overwriteIn this training, this message most likely means that
launch_image_pulls.sh, run near the beginning of the training, has already downloaded the OpenFOAM image to your local image library. Singularity will not overwrite the existing file unless you add the--forceoption to the pull command. Do not force the download unless you need to; continue the exercise using the existingopenfoam--v2606-gcc13DPInt32Opt-mpich3.4.3-ubuntu24.04.siffile.
Prepare the OpenFOAM tutorial case
OpenFOAM is a free and open-source computational fluid dynamics toolbox used to simulate fluid flow and related physical processes. This episode uses OpenFOAM v2606 from the OpenCFD distribution, sometimes referred to as the ESI or OpenCFD flavour of OpenFOAM.
The selected periodicPlaneChannel tutorial simulates turbulent flow through a periodic channel using the pimpleFoam solver and a Large Eddy Simulation model. The case distributed with OpenFOAM is configured for a longer simulated time and four parallel subdomains.
For this training, the preparation scripts adapt the case so that it:
- runs for a shorter simulated time;
- writes results more frequently;
- divides the computational domain into eight subdomains; and
- runs the solver using eight MPI tasks.
The objective is not to teach the OpenFOAM case itself, but to provide a realistic MPI application that can be launched from a container using Slurm.
Why are we using a Pawsey-provided image?
OpenCFD distributes its own OpenFOAM container resources. However, standard OpenFOAM builds commonly use Open MPI, while the Pawsey image used in this episode is deliberately built with MPICH.
Setonix provides Cray MPICH as its host MPI implementation. Using an MPICH-based OpenFOAM image allows the containerised application to use Pawsey’s supported hybrid MPI configuration and the host-optimised communication stack.
The requirement for compatibility between the MPI implementation used to build the application and the MPI implementation provided by the host is explained later in this episode.
The MPI example requires a local copy of the periodicPlaneChannel tutorial with settings suitable for this training. To save time, the prepareTutorial.sh script performs the complete preparation:
- It checks that the OpenFOAM image and the required training files are available.
- It copies the
periodicPlaneChanneltutorial from the container image into the current host directory. - It runs
update-settings.shto update the OpenFOAM dictionaries and the Slurm job script with the settings used in this episode.
Run the preparation script from the demos/openfoam directory:
$ ./prepareTutorial.sh
The script stops if a periodicPlaneChannel directory already exists, rather than overwriting a case prepared during an earlier run. After successful completion, the case is ready to be submitted with the Slurm job script used in the next section.
If curious: inspect the prepared tutorial
List the top-level contents of the copied case:
$ ls -l periodicPlaneChannelThe
update-settings.shscript creates numbered backups before modifying the OpenFOAM dictionaries and the Slurm script. During the first run, the original files are saved with names ending in.original.00.Inspect the settings applied to the OpenFOAM dictionaries:
$ grep -E '^[[:space:]]*(endTime|writeInterval|runTimeModifiable)' \
  periodicPlaneChannel/system/controlDict
$ grep -E '^[[:space:]]*(numberOfSubdomains|method|n[[:space:]])' \
  periodicPlaneChannel/system/decomposeParDict
Compare the modified dictionaries with their original versions:
$ diff -u \
  periodicPlaneChannel/system/controlDict.original.00 \
  periodicPlaneChannel/system/controlDict
$ diff -u \
  periodicPlaneChannel/system/decomposeParDict.original.00 \
  periodicPlaneChannel/system/decomposeParDict
Run the containerised MPI application with Slurm
Submit the Slurm job script:
$ sbatch --reservation=ContainersTraining mpi_openfoam_pawsey.slurm.sh
If no reservation is available: submit the script with defaults
If you are following the tutorial outside a live training session, there will not be a reservation available. The submit the script with its default request of a compute partition with no reservation:
$ sbatch mpi_openfoam_pawsey.slurm.sh
Check the execution status of the job with:
$ squeue --me
JOBID        USER ACCOUNT             NAME EXEC_HOST ST  REASON START_TIME   END_TIME  TIME_LEFT NODES   PRIORITY     QOS
48927321 course01 courses   mpi-openfoam-t nid002604  R    None 18:40:12     19:00:12      19:45     1      75246  normal
The job output can be monitored in the Slurm output file, for example slurm-48927321.out. Use tail -f to follow the output as the job progresses. The name of your file will be different:
$ tail -f slurm-48927321.out
Press Ctrl+C to stop following the file.
Once the job has finished, the results in the case directory will look something like this:
$ ls -ltr periodicPlaneChannel
-rwxr-xr-x   1 cou999 courses01     915 Sep 15 19:05 Allrun
-rwxr-xr-x   1 cou999 courses01     340 Sep 15 19:05 Allclean
drwxr-sr-x   2 cou999 courses01    4096 Sep 15 19:05 0.orig
drwxr-sr-x   2 cou999 courses01    4096 Sep 15 19:06 system
-rw-r--r--   1 cou999 courses01    3299 Sep 15 19:08 log.blockMesh
-rw-r--r--   1 cou999 courses01    2167 Sep 15 19:08 log.renumberMesh
drwxr-sr-x   3 cou999 courses01    4096 Sep 15 19:08 constant
drwxr-sr-x   2 cou999 courses01    4096 Sep 15 19:08 0
-rw-r--r--   1 cou999 courses01    5782 Sep 15 19:08 log.decomposePar
drwxr-sr-x 104 cou999 courses01    4096 Sep 15 19:08 processors8_4-7
drwxr-sr-x 104 cou999 courses01    4096 Sep 15 19:08 processors8_0-3
-rw-r--r--   1 cou999 courses01 1160982 Sep 15 19:08 log.pimpleFoam
-rw-r--r--   1 cou999 courses01    2092 Sep 15 19:09 log.reconstructPar
drwxr-sr-x   3 cou999 courses01    4096 Sep 15 19:09 200
-rw-r--r--   1 cou999 courses01    1763 Sep 15 19:09 log.postChannel
drwxr-sr-x   3 cou999 courses01    4096 Sep 15 19:13 graphs
The job ran with eight MPI processes and produced collated parallel output in processors8_0-3 and processors8_4-7. Each directory stores the results for a group of four MPI ranks. The reconstructPar -latestTime command then reconstructed the latest simulation time, 200, in the host case directory.
Although OpenFOAM ran inside the container, the logs and simulation results were written to the case directory on the host because that directory was available inside the container.
Examine the Slurm script for the containerised MPI application
Now inspect the Slurm job script used for the run:
$ cat mpi_openfoam_pawsey.slurm.sh
#!/bin/bash --login

#SBATCH --job-name=mpi-openfoam-training
#SBATCH --partition=work
#SBATCH --nodes=1
#SBATCH --ntasks=8
#SBATCH --ntasks-per-node=8
#SBATCH --cpus-per-task=1
#SBATCH --time=00:05:00

#--- Load the singularity module (Pawsey's mpi-settings flavour):
module load singularity/4.1.0-mpi

#--- Using user's own image:
export SINGULARITY_IMAGE="$MYSOFTWARE/singularity/images/openfoam--v2606-gcc13DPInt32Opt-mpich3.4.3-ubuntu24.04.sif"  #Adapt path and name to the correct ones
echo "Using openfoam singularity image:"
echo "SINGULARITY_IMAGE=$SINGULARITY_IMAGE"

#--- Prepare the case directory:
caseDir=periodicPlaneChannel
cd $caseDir
rm -rf 0
cp -r 0.orig 0

#--- Specific settings for the cluster you are on
#(Check the specific guide of the cluster for additional settings)

#--- Automating the list of IORANKS for collated fileHandler
echo "Setting the grouping ratio for collated fileHandling"
nProcs=$SLURM_NTASKS #Number of total processors in decomposition for this case
mGroup=4             #Size of the groups for collated fileHandling (32 is the initial recommendation for Setonix)
of_ioRanks="0"
iC=$mGroup
while [ $iC -lt $nProcs ]; do
   of_ioRanks="$of_ioRanks $iC"
   ((iC += $mGroup))
done
export FOAM_IORANKS="("${of_ioRanks}")"
echo "FOAM_IORANKS=$FOAM_IORANKS"

#--- Execute pre-processing tools:
#(These pre-processing tools are serial by design)
singularity exec $SINGULARITY_IMAGE blockMesh | tee log.blockMesh
singularity exec $SINGULARITY_IMAGE renumberMesh -overwrite -constant | tee log.renumberMesh
singularity exec $SINGULARITY_IMAGE decomposePar -cellDist -force | tee log.decomposePar

#--- Execute the parallel solver:
#(Solvers use MPI parallelism by design)
srun -N $SLURM_JOB_NUM_NODES -n $SLURM_NTASKS -c 1 \
  singularity exec $SINGULARITY_IMAGE pimpleFoam -parallel | tee log.pimpleFoam

#--- Execute post-processing tools:
#(These post-processing tools are serial by design)
singularity exec $SINGULARITY_IMAGE reconstructPar -latestTime | tee log.reconstructPar
singularity exec $SINGULARITY_IMAGE postChannel -latestTime | tee log.postChannel

#--- Final commands
echo "OpenFOAM script has reached the end"
The script also contains settings and commands that are specific to OpenFOAM, including case preparation, domain decomposition, collated file handling, reconstruction, and post-processing. We will not explain those parts in detail because this episode focuses on running MPI applications in containers. For more information about running OpenFOAM on Pawsey systems, refer to the Pawsey user documentation.
Instead of reviewing the complete script line by line, we will focus on the parts that illustrate how Slurm, Singularity, and an MPI application work together.
Important Part 1: request resources and select the image
#!/bin/bash --login

#SBATCH --job-name=mpi-openfoam-training
#SBATCH --partition=work
#SBATCH --nodes=1
#SBATCH --ntasks=8
#SBATCH --ntasks-per-node=8
#SBATCH --cpus-per-task=1
#SBATCH --time=00:05:00

#--- Load the singularity module (Pawsey's mpi-settings flavour):
module load singularity/4.1.0-mpi

#--- Using user's own image:
export SINGULARITY_IMAGE="$MYSOFTWARE/singularity/images/openfoam--v2606-gcc13DPInt32Opt-mpich3.4.3-ubuntu24.04.sif"
echo "Using openfoam singularity image:"
echo "SINGULARITY_IMAGE=$SINGULARITY_IMAGE"
- The job requests one node with eight Slurm tasks and one CPU per task. These tasks are later used to run eight MPI processes.
- The
singularity/4.1.0-mpimodule is loaded.- The image path is stored in the user-defined
SINGULARITY_IMAGEvariable.
Important Part 2: run serial tools inside the container
#--- Execute pre-processing tools:
#(These pre-processing tools are serial by design)
singularity exec "$SINGULARITY_IMAGE" blockMesh | tee log.blockMesh
singularity exec "$SINGULARITY_IMAGE" renumberMesh -overwrite -constant | tee log.renumberMesh
singularity exec "$SINGULARITY_IMAGE" decomposePar -cellDist -force | tee log.decomposePar

...

#--- Execute post-processing tools:
#(These post-processing tools are serial by design)
singularity exec "$SINGULARITY_IMAGE" reconstructPar -latestTime | tee log.reconstructPar
singularity exec "$SINGULARITY_IMAGE" postChannel -latestTime | tee log.postChannel
- The required serial pre-processing and post-processing tools are run with
singularity exec "$SINGULARITY_IMAGE" ....- Each pipeline is interpreted by the host shell. Therefore,
teeruns on the host and writes the log file into the host case directory. There is no need to pass the pipeline throughbash -cinside the container.
Important Part 3: launch the parallel solver
#--- Execute the parallel solver:
#(Solvers use MPI parallelism by design)
srun -N "$SLURM_JOB_NUM_NODES" -n "$SLURM_NTASKS" -c 1 \
  singularity exec "$SINGULARITY_IMAGE" pimpleFoam -parallel | tee log.pimpleFoam
srunlaunches eight Slurm tasks. Each task startssingularity exec, which runs one instance of the parallel OpenFOAM solver inside the container.- The MPI-enabled Singularity module provides the host MPI and interconnect configuration required by the containerised application on Setonix.
Understand how Slurm launches the containerised MPI application
The central command in the job script is:
srun -N "$SLURM_JOB_NUM_NODES" -n "$SLURM_NTASKS" -c 1 \
  singularity exec "$SINGULARITY_IMAGE" pimpleFoam -parallel
This command combines three layers of execution:
- Slurm allocates the resources requested by the job.
srun, the Slurm parallel task launcher, starts one task for each requested MPI process.- Each task starts
singularity exec, which runs one instance ofpimpleFoaminside the container.
This execution pattern is commonly called the hybrid MPI model. The launcher and system MPI support are provided by the host, while the MPI application and a compatible MPI implementation are present inside the container. Once launched, the MPI processes communicate through the host MPI and interconnect configuration made available inside the container.
The nesting is important: srun launches singularity, rather than singularity launching srun. As a result, Slurm creates one container process for each task in the job step.
What about
mpirun?On systems where MPI jobs are launched directly with
mpirunormpiexec, the same pattern can be used:mpirun -n 8 \ singularity exec "$SINGULARITY_IMAGE" application-commandThe appropriate launcher and options depend on the HPC system. Always follow the guidance provided by the system administrators.
Build an image for the hybrid MPI model
The practical example in this episode uses the hybrid MPI model. In this model, the host provides the MPI launcher and the system-optimised MPI libraries used at runtime, while the container includes an MPI implementation used to compile and link the application when the image is built.
Because MPI components are present on both sides, the MPI implementation inside the container must be compatible with the MPI implementation provided by the host.
At image build time:
- The image must provide an MPI implementation so that the application can be compiled and linked against MPI.
- The application should be dynamically linked to the MPI libraries.
- The container MPI implementation must be compatible with the host MPI implementation that will be made available at runtime.
At runtime:
- The host scheduler or MPI launcher starts the container instances.
- Compatible host MPI libraries and communication libraries are made available inside the container.
- The application uses the host-optimised MPI stack to communicate between processes and nodes.
The MPI implementation can be installed directly in the application image or inherited from an MPI-enabled base image. The OpenFOAM image used in this episode follows the second approach.
From the MPICH base image to the OpenFOAM image
Pawsey develops and maintains the Dockerfiles for its MPICH base images and OpenFOAM application images in the Pawsey containers Git repository.
The OpenFOAM recipes for this software environment start from Pawsey’s MPICH base image:
FROM quay.io/pawsey/mpich-base:mpich4.2.2-ubuntu24.04
The remaining instructions in those recipes install the OpenFOAM build requirements and compile OpenFOAM on top of the MPI-enabled software environment inherited from the base image. As a result, OpenFOAM is built using the MPICH installation already provided by mpich-base.
The relationship between the images is therefore:
ubuntu:24.04
    |
    v
quay.io/pawsey/mpich-base:mpich4.2.2-ubuntu24.04
    |
    v
Pawsey OpenFOAM image used in this episode
The complete OpenFOAM recipe is not presented here because most of its instructions are specific to building OpenFOAM. For this container training, the relevant part is how the underlying MPICH base image provides the MPI build environment required by the application.
Simplified MPICH base-image recipe
Pawsey’s production MPICH base-image recipe performs several additional tasks, including verifying downloaded source archives, installing MPI testing tools, adding image metadata, and preserving build information. The following simplified Dockerfile excerpt focuses only on the steps used to compile and install MPICH. It uses the same MPICH version and build configuration as Pawsey’s production recipe, while omitting the multi-stage structure and the components that are not required to explain the MPI build procedure.
#--- Define the base image
FROM ubuntu:24.04

#--- Install the prerequisites required to build MPICH
RUN set -eux; \
    export DEBIAN_FRONTEND=noninteractive; \
    apt-get update; \
    apt-get -y --no-install-recommends install \
        build-essential \
        ca-certificates \
        gfortran \
        wget \
    ; \
    apt-get clean; \
    rm -rf /var/lib/apt/lists/*

#--- Define the MPICH version and compilation options
ARG MPICH_VERSION="4.2.2"
ARG MPICH_CONFIGURE_OPTIONS="--enable-fast=O2 --enable-fortran --enable-romio --prefix=/usr --with-device=ch4:ofi CC=gcc CXX=g++ FC=gfortran FFLAGS=-fallow-argument-mismatch FCFLAGS=-fallow-argument-mismatch"
ARG MPICH_MAKE_OPTIONS="-j16"

#--- Download, compile and install MPICH
RUN set -eux; \
    mkdir -p /tmp/mpich-build; \
    cd /tmp/mpich-build; \
    wget --no-hsts \
        "https://www.mpich.org/static/downloads/${MPICH_VERSION}/mpich-${MPICH_VERSION}.tar.gz"; \
    tar xzvf "mpich-${MPICH_VERSION}.tar.gz"; \
    cd "mpich-${MPICH_VERSION}"; \
    ./configure ${MPICH_CONFIGURE_OPTIONS}; \
    make ${MPICH_MAKE_OPTIONS}; \
    make install; \
    ldconfig; \
    rm -rf /tmp/mpich-build
This example installs the build tools, downloads MPICH, and installs it under /usr. Applications added in later Dockerfile instructions can then be compiled using MPI compiler wrappers such as mpicc, mpicxx, and mpifort.
The complete Pawsey recipe verifies the downloaded MPICH archive with a SHA-256 checksum before extracting it. That verification is omitted here to keep the example focused on the MPI build procedure, but downloaded source archives should be verified in production recipes. The production recipe also installs mpi4py, the OSU Micro-Benchmarks, and additional Pawsey MPI test utilities.
Why not install MPICH with
apt-get?MPICH can be installed from the Ubuntu repositories using the
mpichandlibmpich-devpackages. Building from source provides tighter control over the MPICH version, compiler selection, optimisation options, and communication device. That control is useful when preparing an MPI base image for a specific HPC environment.
Match the host MPI family
Applications compiled against one MPI implementation cannot generally be assumed to run with libraries from another implementation. However, several MPICH-derived implementations participate in the MPICH ABI Compatibility Initiative, including MPICH, Cray MPICH, Intel MPI, and MVAPICH2. Open MPI does not share this ABI.
For this reason, an application intended for systems from different MPI families may require separate container-image variants. Compatibility must also be tested with the specific host software stack because non-standard interfaces and some language bindings may fall outside an ABI compatibility agreement.
MPI compatibility on Setonix
Setonix provides Cray MPICH, which is derived from MPICH and optimised for the Slingshot interconnect. Pawsey’s MPICH-based container images are prepared and tested for use with the host MPI environment on Setonix.
Pawsey also maintains an MPICH base image at quay.io/pawsey/mpich-base. It can be used as the starting point for containerising other MPI applications.
Use the host MPI and interconnect libraries at runtime
MPI ABI compatibility is necessary, but it is not sufficient for efficient multi-node execution. The application must also be able to use the host communication libraries that provide access to the high-speed interconnect.
On Pawsey systems, the MPI-enabled Singularity module configures this integration:
$ module load singularity/4.1.0-mpi
Among other settings, the module defines:
SINGULARITY_BINDPATH, which makes the required Pawsey filesystems, Cray software directories, and host libraries available inside the container.SINGULARITYENV_LD_LIBRARY_PATH, which adds the compatible host MPI and communication libraries to the library search path inside the container.SINGULARITYENV_LD_PRELOAD, which preloads selected host libraries required to use the MPI and interconnect environment.
Variables whose names begin with SINGULARITYENV_ are passed into the container without that prefix. For example, SINGULARITYENV_LD_LIBRARY_PATH defines LD_LIBRARY_PATH inside the container.
This is why the practical example does not manually define MPI library paths, preload libraries, or additional bind mounts. Those system-specific settings are supplied by the Pawsey module.
Inspect the settings provided by the module
The configuration applied by a module can be inspected using
module show:$ module show singularity/4.1.0-mpiThe complete output is intentionally not reproduced here. It contains long, system-specific lists of directories and libraries, and may change when the Setonix software environment is updated.
To inspect only the main Singularity variables after loading the module, use:
$ env | grep '^SINGULARITY' | sort
Configuration differs between HPC systems
On another HPC system, the module name, host MPI implementation, supported container MPI versions, bind mounts, preloaded libraries, and environment variables may differ. Follow the container and MPI documentation for the system where the application will run. For Pawsey-specific guidance, see the Singularity user documentation.
Compare container and native MPI performance
MPI containers are useful only if the host MPI and interconnect can be used without introducing unacceptable overhead. The following figures compare container and native executions of three OSU Micro-Benchmarks.
The figures show results for a particular system and MPI configuration. They provide a qualitative comparison for that tested environment, not a guarantee for every MPI application, container image, or HPC system.
Point-to-point bandwidth
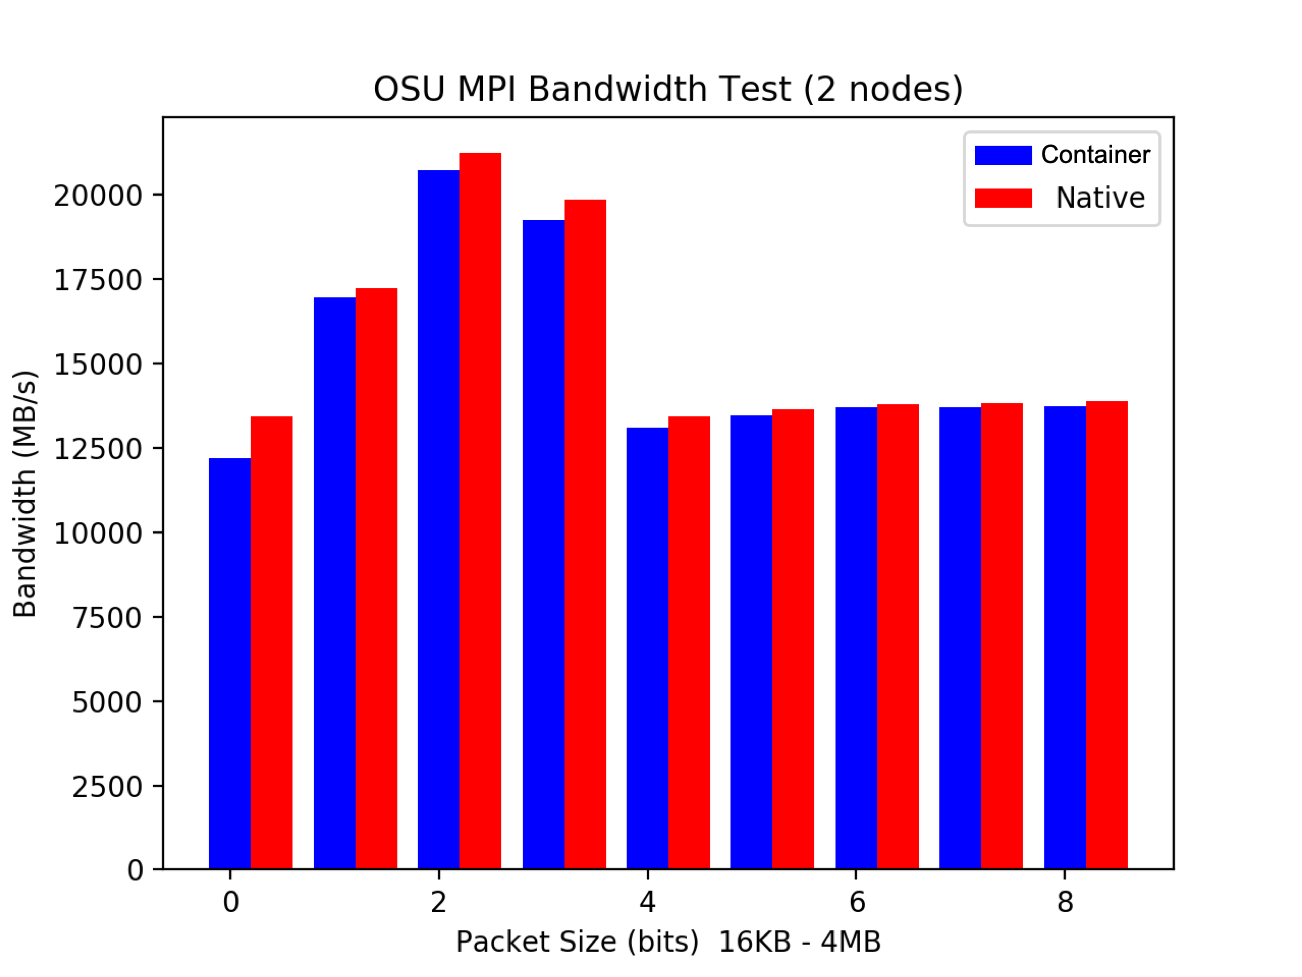
Native bandwidth is slightly higher across the displayed measurements. The difference is small for most measurements, although the first displayed measurement shows a more noticeable gap.
Point-to-point latency
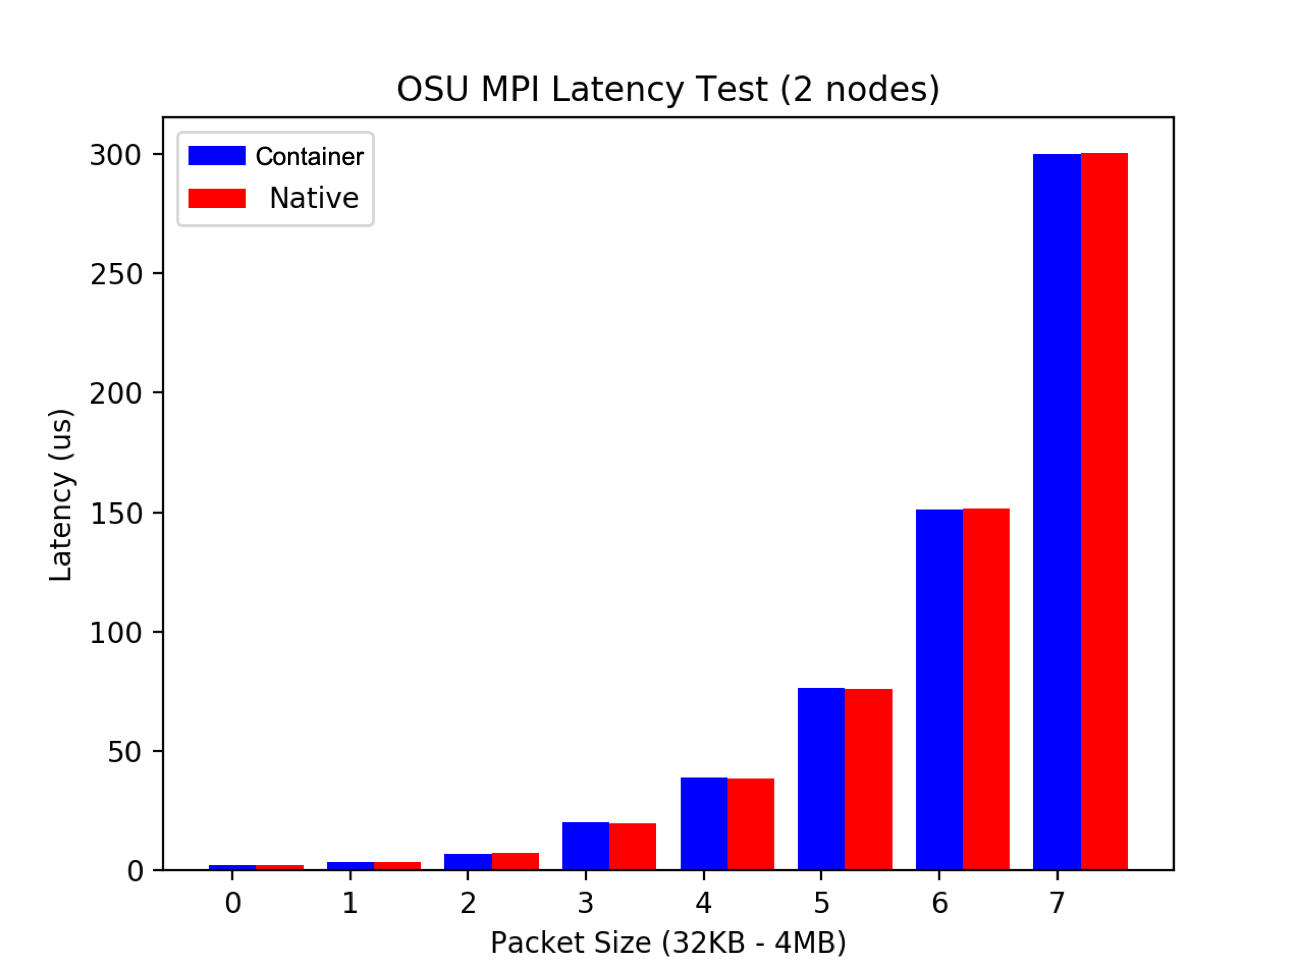
Container and native point-to-point latency are nearly indistinguishable at the scale shown.
Collective latency
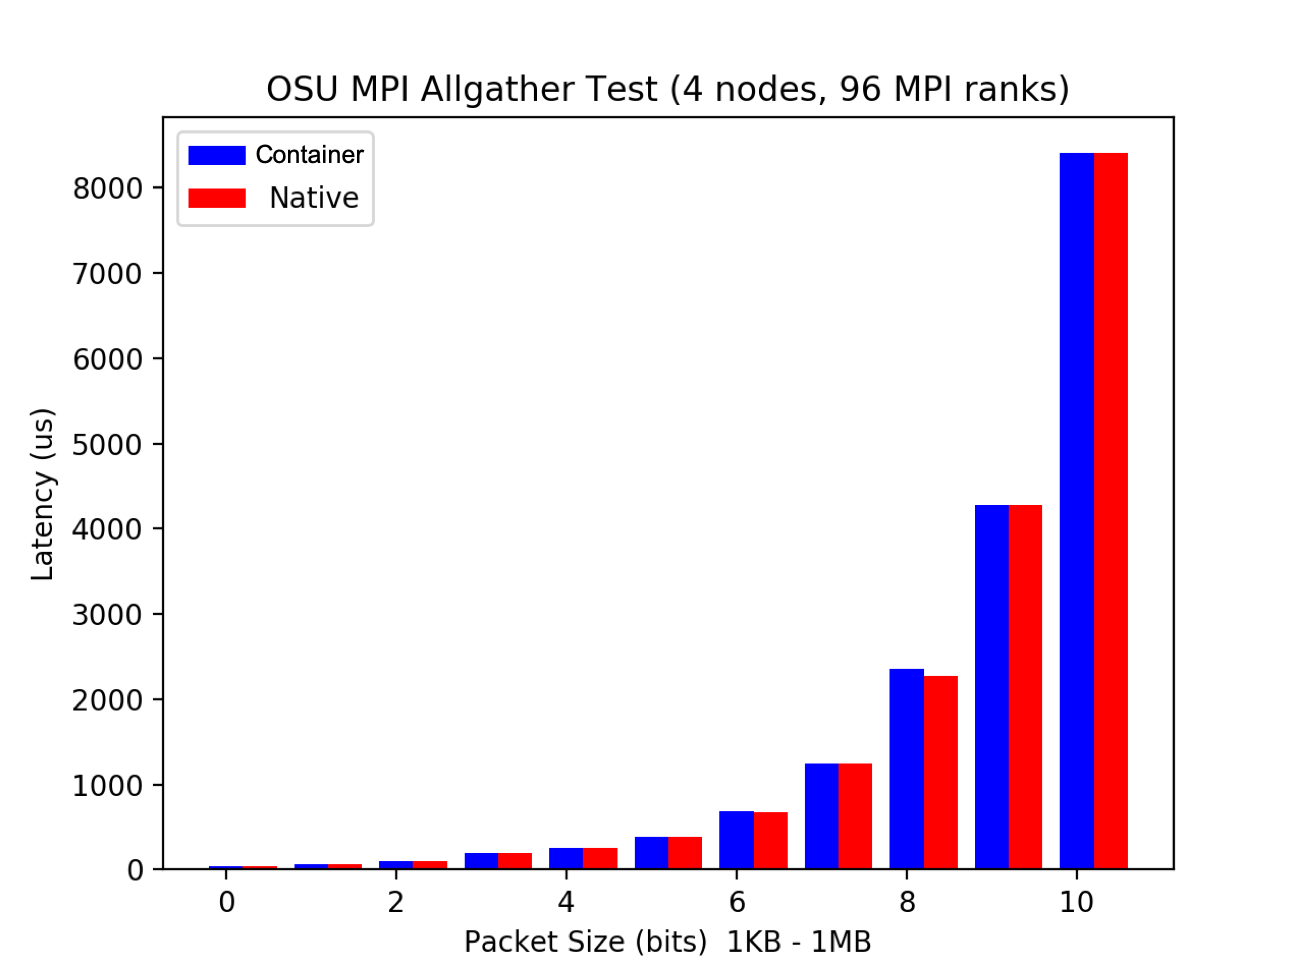
The Allgather results are also very similar, including at the largest displayed message size.
Together, these microbenchmarks indicate that the tested container configuration introduces little MPI communication overhead. Real applications should still be validated on the target system because performance also depends on application behaviour, process placement, filesystem access, MPI configuration, and the communication patterns used.
Main MPI container workflow
To run a containerised MPI application efficiently on an HPC system:
- Build the application against an MPI implementation compatible with the target host MPI.
- Use the host scheduler or MPI launcher to start one container instance per task.
- Expose the host MPI and interconnect libraries using the configuration supported by the HPC system.
- Validate correctness and performance on the target system.
Key Points
Launchers such as
srunstartsingularity exec, creating one container process for each task in the parallel job step.In the hybrid MPI model, the host launches the MPI tasks while the container provides the MPI application and an MPI implementation used to build it.
The container MPI must be compatible with the host MPI, and efficient multi-node execution requires access to the host interconnect libraries.
On Pawsey systems, the
singularity/4.1.0-mpimodule configures the required bind mounts, library paths, and preloaded host libraries.A correctly configured MPI container can achieve communication performance close to native execution, but performance must be validated on the target system.