Python containers and HPC
Overview
Teaching: 15 min
Exercises: 30 minQuestions
Objectives
MPI: requirements for containers
In order to scale a containerised application across multiple nodes in an HPC cluster, we need to be able to spawn multiple singularity processes through the host MPI (mpirun, or srun in the case of Slurm). Each singularity process will launch its own application instance; the set of instances will communicate using the underlying host MPI framework.
Singularity has been designed to support spawning and inter-communication of multiple instances.
However, there are still some requirements to make this setup work. A specific goal here is to be able to effectively use the high-speed interconnect networking hardware in the HPC site, to maximise performance.
Different approaches are possible, in particular the hybrid (or host) model, and the bind model (see also Singularity and MPI applications).
The hybrid model relies on configuring the software build in the container so that it is optimised for the host hardware; this add complexity to the Dockerfile and reduces portability.
The bind model, on the other hand, shifts the complexity of configuring for the host interconnect at the runtime configuration; this improves portability, but requires some care to achieve maximum performance.
Let’s outline the key requirements for the bind model.
-
A host MPI installation must be present to spawn the MPI processes.
-
An MPI installation is required in the container, to compile the application. Also, during build the application must be linked dynamically to the MPI libraries, so as to have the capability of using the host ones at runtime. Note how dynamic linking is typically the default behaviour on Linux systems.
-
The container and host MPI installations need to be ABI (Application Binary Interface) compatible. This is because the application in the container is built with the former but runs with the latter.
At present, there are just two families of MPI implementations, not ABI compatible with each other: MPICH (with Intel MPI and MVAPICH) and OpenMPI. -
Bind mounts and environment variables need to be setup at singularity runtime, so that the containerised MPI application can use the host MPI libraries at runtime. If the HPC system you’re using has high speed interconnect infrastructure, you will need to expose the corresponding system libraries in the container, too.
In practice, you would need to useSINGULARITY_BINDPATHto mount appropriate host directory paths, and thenSINGULARITYENV_LD_LIBRARY_PATHto let the application know where to look for the required library files.
Overall, this can be a challenging task for a user, as it requires knowing details on the installed software stack. System administrators typically have the required know-how to execute this.
MPI and Singularity at Pawsey
Pawsey maintains MPICH and OpenMPI base images at pawsey/mpich-base and pawsey/openmpi-base, respectively.
At the moment, only Docker images are provided, which of course can also be used by Singularity.All Pawsey systems have installed at least one MPICH ABI compatible implementation: CrayMPICH on the Crays (Magnus and Galaxy), Intel MPI on Zeus, Topaz and Garrawarla. Therefore, MPICH is the recommended MPI library to install in container images.
Zeus, Topaz and Garrawarla also have OpenMPI, so images built over this MPI family can run in these clusters, upon appropriate configuration of the shell environment (see below).At the time of writing,
singularitymodules at Pawsey configure the shell environment to enable use of Intel MPI and the high-speed interconnects.
OpenMPI-enabledsingularitymodules are under development.
Python and MPI: the example of mpi4py
At the end of the previous episode, we discussed a Dockerfile to build an MPI enabled container shipping mpi4py (files under 3.mpi4py/).
For convenience, here’s the Dockerfile again, see symlinked Dockerfile.1-mpi4py:
FROM python:3.8-slim

RUN apt-get update -qq \
      && apt-get -y --no-install-recommends install \
         build-essential \
         ca-certificates \
         gdb \
         gfortran \
         wget \
      && apt-get clean all \
      && rm -r /var/lib/apt/lists/*

ARG MPICH_VERSION="3.1.4"
ARG MPICH_CONFIGURE_OPTIONS="--enable-fast=all,O3 --prefix=/usr"
ARG MPICH_MAKE_OPTIONS="-j4"

RUN mkdir -p /tmp/mpich-build \
      && cd /tmp/mpich-build \
      && wget http://www.mpich.org/static/downloads/${MPICH_VERSION}/mpich-${MPICH_VERSION}.tar.gz \
      && tar xvzf mpich-${MPICH_VERSION}.tar.gz \
      && cd mpich-${MPICH_VERSION}  \
      && ./configure ${MPICH_CONFIGURE_OPTIONS} \
      && make ${MPICH_MAKE_OPTIONS} \
      && make install \
      && ldconfig \
      && cp -p /tmp/mpich-build/mpich-${MPICH_VERSION}/examples/cpi /usr/bin/ \
      && cd / \
      && rm -rf /tmp/mpich-build

ARG MPI4PY_VERSION="3.0.3"

RUN pip --no-cache-dir install --no-deps mpi4py==${MPI4PY_VERSION}

CMD [ "/bin/bash" ]
Now you see that, as MPICH was used to build mpi4py in the container, then at runtime you’ll need to use a host MPI library which is ABI compatible with MPICH.
Remember we built the container image m:1 out of this Dockerfile; let’s play with it on one of Pawsey’s HPC clusters, Zeus in this instance.
First, we need to convert the image to the singularity format:
$ singularity pull docker-daemon:m:1
And then to transfer the resulting file, m_1.sif, onto the cluster.
Here we’ll also assume that we’ve got a copy of this github repo on Zeus, and that we’ve executed module load singularity.
Alternate way without Pawsey HPC
If you don’t have access to Pawsey HPC clusters, you can still get the essence of the next steps.
Just use this script to install MPICH in the same machine where you’re running Docker and Singularity; this will be enough to mimic what follows. You just won’t be able to get similar figures for the bandwidth tests.
Let’s convince ourselves that the singularity module does indeed take care of the host MPI/interconnect configuration; here the Intel MPI installation is used. Look for SINGULARITY_BINDPATH and SINGULARITYENV_LD_LIBRARY_PATH in this output:
$ module show singularity
------------------------------------------------------------------------------------------------------------------------------------------------------------------------------
   /pawsey/sles12sp3/modulefiles/devel/singularity/3.6.4.lua:
------------------------------------------------------------------------------------------------------------------------------------------------------------------------------
help([[Sets up the paths you need to use singularity version 3.6.4]])
whatis("Singularity enables users to have full control of their environment. Singularity
containers can be used to package entire scientific workflows, software and
libraries, and even data.

For further information see https://sylabs.io/singularity")
whatis("Compiled with gcc/4.8.5")
load("go")
setenv("MAALI_SINGULARITY_HOME","/pawsey/sles12sp3/devel/gcc/4.8.5/singularity/3.6.4")
prepend_path("PATH","/pawsey/sles12sp3/devel/gcc/4.8.5/singularity/3.6.4/bin")
setenv("SINGULARITYENV_FI_PROVIDER_PATH","/pawsey/intel/19.0.5/compilers_and_libraries/linux/mpi/intel64/libfabric/lib/prov")
setenv("SINGULARITYENV_I_MPI_ROOT","/pawsey/intel/19.0.5/compilers_and_libraries/linux/mpi")
setenv("SINGULARITYENV_LD_LIBRARY_PATH","/usr/lib64:/pawsey/intel/19.0.5/compilers_and_libraries/linux/mpi/intel64/libfabric/lib:/pawsey/intel/19.0.5/compilers_and_libraries/linux/mpi/intel64/lib/release:/pawsey/intel/19.0.5/compilers_and_libraries/linux/mpi/intel64/lib:$LD_LIBRARY_PATH")
setenv("SINGULARITYENV_OMPI_MCA_btl_openib_allow_ib","1")
setenv("SINGULARITY_BINDPATH","/astro,/group,/scratch,/pawsey,/etc/dat.conf,/etc/libibverbs.d,/usr/lib64/libdaplofa.so.2,/usr/lib64/libdaplofa.so.2.0.0,/usr/lib64/libdat2.so.2,/usr/lib64/libdat2.so.2.0.0,/usr/lib64/libibverbs,/usr/lib64/libibverbs.so,/usr/lib64/libibverbs.so.1,/usr/lib64/libibverbs.so.1.1.14,/usr/lib64/libmlx5.so,/usr/lib64/libmlx5.so.1,/usr/lib64/libmlx5.so.1.1.14,/usr/lib64/libnl-3.so.200,/usr/lib64/libnl-3.so.200.18.0,/usr/lib64/libnl-cli-3.so.200,/usr/lib64/libnl-cli-3.so.200.18.0,/usr/lib64/libnl-genl-3.so.200,/usr/lib64/libnl-genl-3.so.200.18.0,/usr/lib64/libnl-idiag-3.so.200,/usr/lib64/libnl-idiag-3.so.200.18.0,/usr/lib64/libnl-nf-3.so.200,/usr/lib64/libnl-nf-3.so.200.18.0,/usr/lib64/libnl-route-3.so.200,/usr/lib64/libnl-route-3.so.200.18.0,/usr/lib64/librdmacm.so,/usr/lib64/librdmacm.so.1,/usr/lib64/librdmacm.so.1.0.14,/usr/lib64/libnuma.so.1,/usr/lib64/libpciaccess.so.0,/usr/lib64/libpmi.so.0,/usr/lib64/libpmi2.so.0,/usr/lib64/libpsm2.so.2,/usr/lib64/slurm/libslurmfull.so")
setenv("SINGULARITY_CACHEDIR","/group/pawsey0001/mdelapierre/.singularity")
As the first thing, we want to check how mpi4py links to available MPI libraries.
Here we’re looking for the right path location:
$ singularity exec -e m_1.sif find /usr -name "mpi4py*"
/usr/local/lib/python3.8/site-packages/mpi4py
/usr/local/lib/python3.8/site-packages/mpi4py/include/mpi4py
/usr/local/lib/python3.8/site-packages/mpi4py/include/mpi4py/mpi4py.MPI.h
/usr/local/lib/python3.8/site-packages/mpi4py/include/mpi4py/mpi4py.MPI_api.h
/usr/local/lib/python3.8/site-packages/mpi4py/include/mpi4py/mpi4py.h
/usr/local/lib/python3.8/site-packages/mpi4py/include/mpi4py/mpi4py.i
/usr/local/lib/python3.8/site-packages/mpi4py-3.0.3.dist-info
$ singularity exec -e m_1.sif ls /usr/local/lib/python3.8/site-packages/mpi4py
MPI.cpython-38-x86_64-linux-gnu.so  __init__.pxd  __main__.py  bench.py				  futures  lib-pmpi    mpi.cfg
MPI.pxd				    __init__.py   __pycache__  dl.cpython-38-x86_64-linux-gnu.so  include  libmpi.pxd  run.py
And now we’re using the Linux utility ldd to get information on libraries that the mpi4py MPI library links to:
$ singularity exec -e m_1.sif ldd /usr/local/lib/python3.8/site-packages/mpi4py/MPI.cpython-38-x86_64-linux-gnu.so
	linux-vdso.so.1 (0x00007ffc511fe000)
	libdl.so.2 => /lib/x86_64-linux-gnu/libdl.so.2 (0x00007f3c4e1c1000)
	libmpi.so.12 => /pawsey/intel/17.0.5/compilers_and_libraries/linux/mpi/intel64/lib/libmpi.so.12 (0x00007f3c4d48b000)
	libpthread.so.0 => /lib/x86_64-linux-gnu/libpthread.so.0 (0x00007f3c4d46a000)
	libc.so.6 => /lib/x86_64-linux-gnu/libc.so.6 (0x00007f3c4d2a9000)
	/lib64/ld-linux-x86-64.so.2 (0x00007f3c4e348000)
	librt.so.1 => /lib/x86_64-linux-gnu/librt.so.1 (0x00007f3c4d29f000)
	libgcc_s.so.1 => /lib/x86_64-linux-gnu/libgcc_s.so.1 (0x00007f3c4d283000)
Indeed, you can see that mpi4py binds to the host Intel MPI library: /pawsey/intel/17.0.5/compilers_and_libraries/linux/mpi/intel64/lib/libmpi.so.12.
Now, let’s unset LD_LIBRARY_PATH in the container:
$ singularity exec -e m_1.sif bash -c 'unset LD_LIBRARY_PATH ; ldd /usr/local/lib/python3.8/site-packages/mpi4py/MPI.cpython-38-x86_64-linux-gnu.so'
	linux-vdso.so.1 (0x00007fff5cfb9000)
	libdl.so.2 => /lib/x86_64-linux-gnu/libdl.so.2 (0x00007f3d0ed8a000)
	libmpi.so.12 => /usr/lib/libmpi.so.12 (0x00007f3d0eb0d000)
	libpthread.so.0 => /lib/x86_64-linux-gnu/libpthread.so.0 (0x00007f3d0eaec000)
	libc.so.6 => /lib/x86_64-linux-gnu/libc.so.6 (0x00007f3d0e92b000)
	/lib64/ld-linux-x86-64.so.2 (0x00007f3d0ef11000)
	librt.so.1 => /lib/x86_64-linux-gnu/librt.so.1 (0x00007f3d0e921000)
	libgfortran.so.5 => /usr/lib/x86_64-linux-gnu/libgfortran.so.5 (0x00007f3d0e6b3000)
	libm.so.6 => /lib/x86_64-linux-gnu/libm.so.6 (0x00007f3d0e52e000)
	libgcc_s.so.1 => /lib/x86_64-linux-gnu/libgcc_s.so.1 (0x00007f3d0e514000)
	libquadmath.so.0 => /usr/lib/x86_64-linux-gnu/libquadmath.so.0 (0x00007f3d0e4d2000)
	libz.so.1 => /lib/x86_64-linux-gnu/libz.so.1 (0x00007f3d0e2b4000)
Now we’re falling back to the container MPI, in /usr/lib/libmpi.so.12. You’d never use this in production, but it’s good to have a close look for once.
All right, now let’s get an interactive Slurm allocation, with two cores on two distinct nodes:
$ salloc -n 2 --ntasks-per-node=1 -p debugq -t 10:00
As pointed out in the previous episode, resource managers such as Slurm need the shell environment at application runtime to setup MPI communication, so rather than using the singularity -e flag we’re getting rid of any Python related variables in the shell session for good:
$ unset $( env | grep ^PYTHON | cut -d = -f 1 | xargs )
Then let’s see mpi4py in action, starting with the simple hello-mpi4py.py script:
$ srun singularity exec m_1.sif python3 hello-mpi4py.py
Hello World! I am process 1 of 2 on z127.
Hello World! I am process 0 of 2 on z126.
Sweet!
Note how you can use singularity in conjunction with srun, in the same way as with any other application.
Can we have a little look at performance?
The provided script osu-bw.py implements a small core to core bandwidth test:
$ srun singularity exec m_1.sif python3 osu-bw.py
# MPI Bandwidth Test
# Size [B]    Bandwidth [MB/s]
1                         0.57
2                         1.19
4                         2.53
8                         4.37
16                        6.24
32                       12.35
64                       24.63
128                      48.17
256                     106.87
512                     204.93
1024                    395.58
2048                    754.55
4096                   1391.42
8192                   2467.49
16384                  2583.36
32768                  2752.52
65536                  2842.06
131072                 2910.04
262144                 4469.70
524288                 6872.53
1048576                8775.95
With a 1 MB message, we get about 8 GB/s of bandwidth.
What happens if we bypass the interconnect by again unsetting LD_LIBRARY_PATH?
$ srun singularity exec m_1.sif bash -c 'unset LD_LIBRARY_PATH ; python3 osu-bw.py'
# MPI Bandwidth Test
# Size [B]    Bandwidth [MB/s]
1                         0.26
2                         0.54
4                         1.06
8                         2.03
16                        3.09
32                        5.92
64                       11.86
128                      17.68
256                      34.19
512                      54.21
1024                     74.66
2048                     92.61
4096                    104.83
8192                    111.23
16384                   113.94
32768                   116.07
65536                   116.58
131072                  116.77
262144                  117.19
524288                  117.38
1048576                 117.45
Bandwidth has dropped to only 100 MB/s for a 1 MB message! Again, you’d never do this in production, but this is hopefully a good demonstration of why a proper MPI/interconnect setup matters.
Remember to exit your interactive Slurm session when you’re done.
One more MPI example: parallel h5py
Let’s see how we can build a container image with the h5py library, used to handle large datasets using the HDF5 file format. We’re going to build on top of what we learn on mpi4py, and get enable support for the package.
Here is the Dockerfile, see Dockerfile.2-h5py:
FROM python:3.8-slim

RUN apt-get update -qq \
      && apt-get -y --no-install-recommends install \
         build-essential \
         ca-certificates \
         gdb \
         gfortran \
         wget \
      && apt-get clean all \
      && rm -r /var/lib/apt/lists/*

ARG MPICH_VERSION="3.1.4"
ARG MPICH_CONFIGURE_OPTIONS="--enable-fast=all,O3 --prefix=/usr"
ARG MPICH_MAKE_OPTIONS="-j4"

RUN mkdir -p /tmp/mpich-build \
      && cd /tmp/mpich-build \
      && wget http://www.mpich.org/static/downloads/${MPICH_VERSION}/mpich-${MPICH_VERSION}.tar.gz \
      && tar xvzf mpich-${MPICH_VERSION}.tar.gz \
      && cd mpich-${MPICH_VERSION}  \
      && ./configure ${MPICH_CONFIGURE_OPTIONS} \
      && make ${MPICH_MAKE_OPTIONS} \
      && make install \
      && ldconfig \
      && cp -p /tmp/mpich-build/mpich-${MPICH_VERSION}/examples/cpi /usr/bin/ \
      && cd / \
      && rm -rf /tmp/mpich-build

ARG MPI4PY_VERSION="3.0.3"

RUN pip --no-cache-dir install --no-deps mpi4py==${MPI4PY_VERSION}

# Install HDF5-parallel

ARG HDF5_VERSION="1.10.4"
ARG HDF5_CONFIGURE_OPTIONS="--prefix=/usr --enable-parallel CC=mpicc"
ARG HDF5_MAKE_OPTIONS="-j4"

RUN mkdir -p /tmp/hdf5-build \
      && cd /tmp/hdf5-build \
      && HDF5_VER_MM="${HDF5_VERSION%.*}" \
      && wget https://support.hdfgroup.org/ftp/HDF5/releases/hdf5-${HDF5_VER_MM}/hdf5-${HDF5_VERSION}/src/hdf5-${HDF5_VERSION}.tar.gz \
      && tar xzf hdf5-${HDF5_VERSION}.tar.gz \
      && cd hdf5-${HDF5_VERSION} \
      && ./configure ${HDF5_CONFIGURE_OPTIONS} \
      && make ${HDF5_MAKE_OPTIONS} \
      && make install \
      && ldconfig \
      && cd / \
      && rm -rf /tmp/hdf5-build

ARG H5PY_VERSION="2.10.0"
RUN CC="mpicc" HDF5_MPI="ON" HDF5_DIR="/usr" pip --no-cache-dir install --no-deps --no-binary=h5py h5py==${H5PY_VERSION}

CMD [ "/bin/bash" ]
By default, pip would install the serial version of h5py, so we need to build both HDF5 and h5py from source.
For HDF5, see how we’re using the MPI C compiler, mpicc:
ARG HDF5_CONFIGURE_OPTIONS="--prefix=/usr --enable-parallel CC=mpicc"
And then for h5py see how we provide MPI specific information:
RUN CC="mpicc" HDF5_MPI="ON" HDF5_DIR="/usr" pip --no-cache-dir install --no-deps --no-binary=h5py h5py==${H5PY_VERSION}
Now, back to our build workstation, let us build the container:
$ docker build -t m:2 -f Dockerfile.2-h5py .
And convert it to singularity format:
$ singularity pull docker-daemon:m:2
We can again use ldd to inspect library linking:
$ singularity exec -e m_2.sif find /usr -name "h5py*"
/usr/local/lib/python3.8/site-packages/h5py
/usr/local/lib/python3.8/site-packages/h5py/__pycache__/h5py_warnings.cpython-38.pyc
/usr/local/lib/python3.8/site-packages/h5py/h5py_warnings.py
/usr/local/lib/python3.8/site-packages/h5py-2.10.0-py3.8.egg-info
$ singularity exec -e m_2.sif ls /usr/local/lib/python3.8/site-packages/h5py
__init__.py				 h5.cpython-38-x86_64-linux-gnu.so    h5i.cpython-38-x86_64-linux-gnu.so   h5t.cpython-38-x86_64-linux-gnu.so
__pycache__				 h5a.cpython-38-x86_64-linux-gnu.so   h5l.cpython-38-x86_64-linux-gnu.so   h5z.cpython-38-x86_64-linux-gnu.so
_conv.cpython-38-x86_64-linux-gnu.so	 h5ac.cpython-38-x86_64-linux-gnu.so  h5o.cpython-38-x86_64-linux-gnu.so   highlevel.py
_errors.cpython-38-x86_64-linux-gnu.so	 h5d.cpython-38-x86_64-linux-gnu.so   h5p.cpython-38-x86_64-linux-gnu.so   ipy_completer.py
_hl					 h5ds.cpython-38-x86_64-linux-gnu.so  h5pl.cpython-38-x86_64-linux-gnu.so  tests
_objects.cpython-38-x86_64-linux-gnu.so  h5f.cpython-38-x86_64-linux-gnu.so   h5py_warnings.py			   utils.cpython-38-x86_64-linux-gnu.so
_proxy.cpython-38-x86_64-linux-gnu.so	 h5fd.cpython-38-x86_64-linux-gnu.so  h5r.cpython-38-x86_64-linux-gnu.so   version.py
defs.cpython-38-x86_64-linux-gnu.so	 h5g.cpython-38-x86_64-linux-gnu.so   h5s.cpython-38-x86_64-linux-gnu.so
$ singularity exec -e m_2.sif ldd /usr/local/lib/python3.8/site-packages/h5py/h5.cpython-38-x86_64-linux-gnu.so
	linux-vdso.so.1 (0x00007ffee5f27000)
	libhdf5.so.103 => /usr/lib/libhdf5.so.103 (0x00007f4e68e19000)
	libhdf5_hl.so.100 => /usr/lib/libhdf5_hl.so.100 (0x00007f4e68df3000)
	libpthread.so.0 => /lib/x86_64-linux-gnu/libpthread.so.0 (0x00007f4e68dce000)
	libc.so.6 => /lib/x86_64-linux-gnu/libc.so.6 (0x00007f4e68c0d000)
	libdl.so.2 => /lib/x86_64-linux-gnu/libdl.so.2 (0x00007f4e68c08000)
	libm.so.6 => /lib/x86_64-linux-gnu/libm.so.6 (0x00007f4e68a85000)
	libmpi.so.12 => /usr/lib/libmpi.so.12 (0x00007f4e68806000)
	/lib64/ld-linux-x86-64.so.2 (0x00007f4e69228000)
	librt.so.1 => /lib/x86_64-linux-gnu/librt.so.1 (0x00007f4e687fc000)
	libgfortran.so.5 => /usr/lib/x86_64-linux-gnu/libgfortran.so.5 (0x00007f4e6858e000)
	libgcc_s.so.1 => /lib/x86_64-linux-gnu/libgcc_s.so.1 (0x00007f4e68574000)
	libquadmath.so.0 => /usr/lib/x86_64-linux-gnu/libquadmath.so.0 (0x00007f4e68532000)
	libz.so.1 => /lib/x86_64-linux-gnu/libz.so.1 (0x00007f4e68312000)
On our build cluster, without any host MPI binding, h5p libraries bind to the container MPICH installation, /usr/lib/libmpi.so.12.
But, if we transfer the image file to Zeus and run the command there ..
	linux-vdso.so.1 (0x00007ffe76ba4000)
	libhdf5.so.103 => /usr/lib/libhdf5.so.103 (0x00007f03e2509000)
	libhdf5_hl.so.100 => /usr/lib/libhdf5_hl.so.100 (0x00007f03e24e3000)
	libpthread.so.0 => /lib/x86_64-linux-gnu/libpthread.so.0 (0x00007f03e24be000)
	libc.so.6 => /lib/x86_64-linux-gnu/libc.so.6 (0x00007f03e22fd000)
	libdl.so.2 => /lib/x86_64-linux-gnu/libdl.so.2 (0x00007f03e22f8000)
	libm.so.6 => /lib/x86_64-linux-gnu/libm.so.6 (0x00007f03e2175000)
	libmpi.so.12 => /pawsey/intel/17.0.5/compilers_and_libraries/linux/mpi/intel64/lib/libmpi.so.12 (0x00007f03e143d000)
	/lib64/ld-linux-x86-64.so.2 (0x00007f03e2918000)
	librt.so.1 => /lib/x86_64-linux-gnu/librt.so.1 (0x00007f03e1433000)
	libgcc_s.so.1 => /lib/x86_64-linux-gnu/libgcc_s.so.1 (0x00007f03e1419000)
.. we get linking to the host Intel MPI, /pawsey/intel/17.0.5/compilers_and_libraries/linux/mpi/intel64/lib/libmpi.so.12!
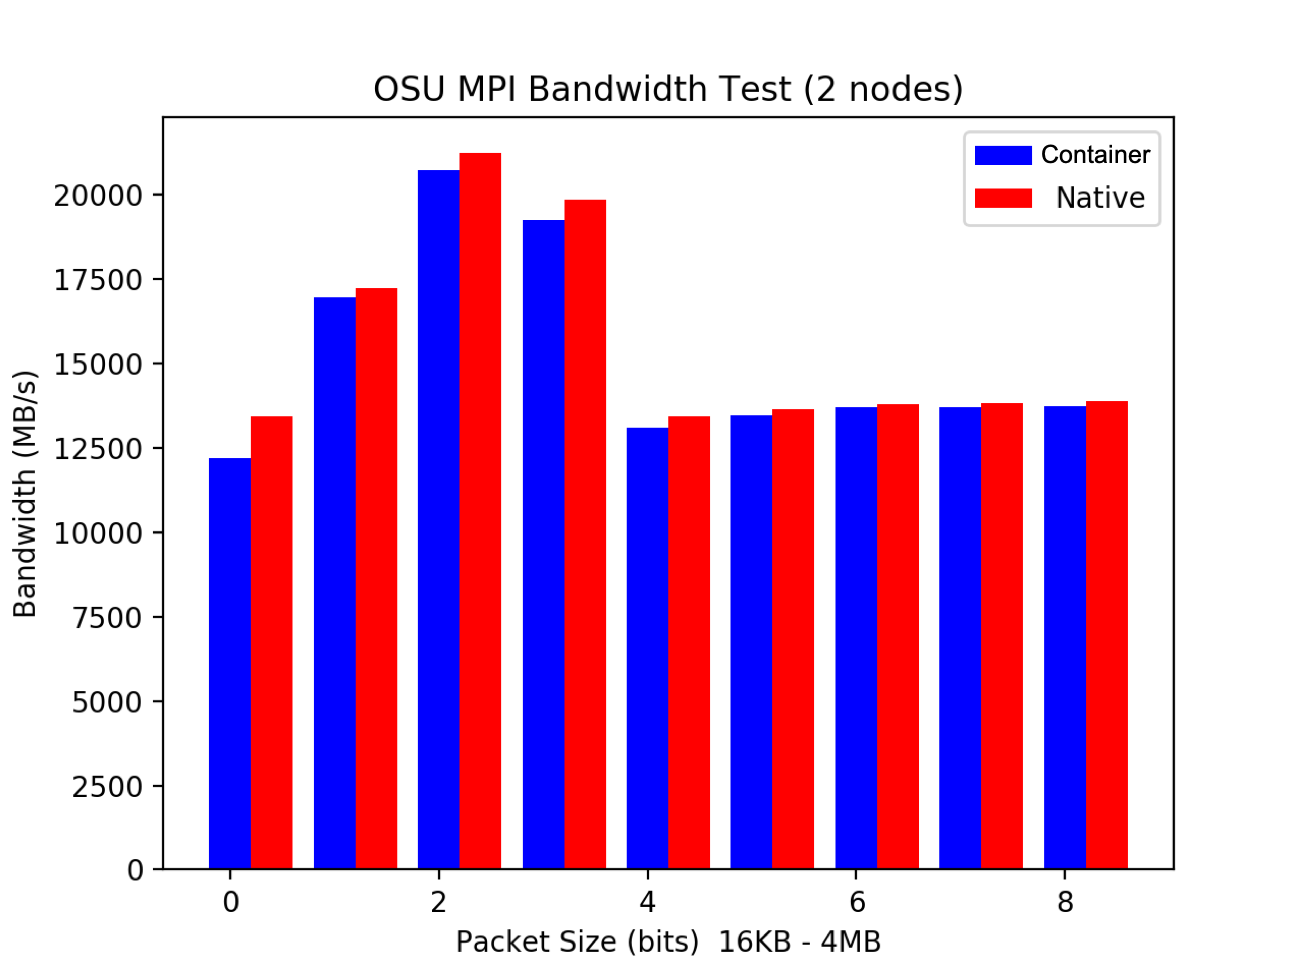
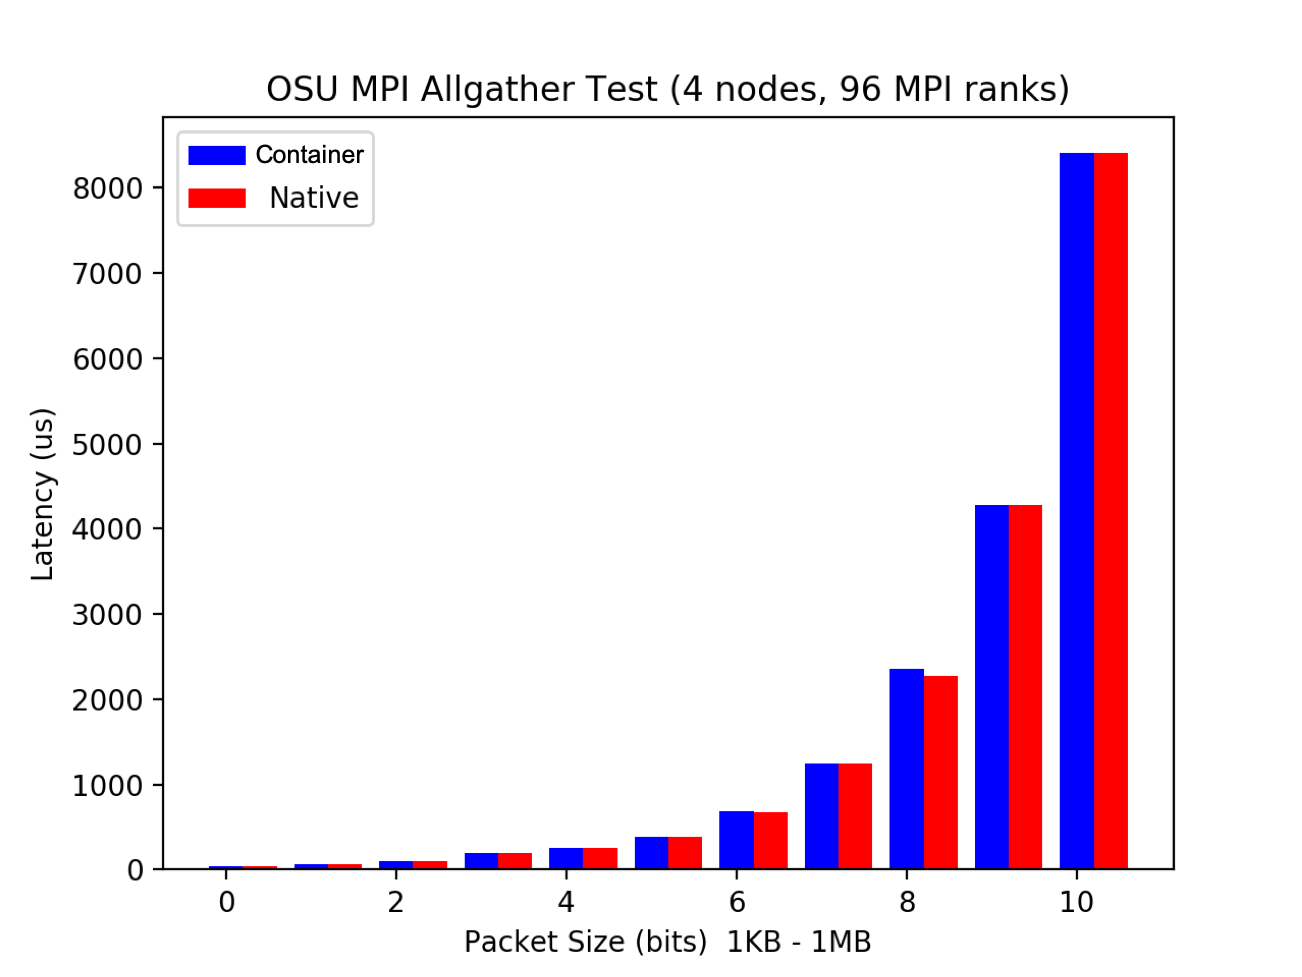
MPI performance: container vs bare metal
What’s the performance overhead in running an MPI application through containers, as compared to bare metal runs?
Well, the benchmark figures just below reveal it’s quite small…good news!

Requirements for GPU enabled containers
In this context, in general the container image will need to embed the libraries and tools that are required at build and runtime of the application, as per any other application.
The one thing that is not required in the image is the GPU card driver; in fact, singularity is able to look for it in the host, and bind mount it to the running container.
To enable this behaviour, the --nv flag is required for Nvidia cards, and the --rocm one for AMD cards (this latter feature is experimental at the time of writing).
It’s a good thing that singularity allows for host mounting of the card driver, as this is a machine specific, rather than application specific, component.
Python and CUDA: an example with numba
Numba is a Python package that allows GPU offloading to both Nvidia and AMD accelerators.
Here we’ll focus on the Nvidia case (files under 3.cuda/).
Let’s think about how to write the Dockerfile. By looking at the documentation for numba, we see that it needs the full Nvidia CUDA SDK, corresponding to to the devel container image by Nvidia.
So, we have a package that requires Python and CUDA. A bit like the case of mpi4py we discussed in the previous episode, we’ve got base images for both these frameworks, it then boils down to picking one as base image, and then explicit implement the other one in the Dockerfile, being careful about possible clashes (not the case here).
For reference, here are the Dockerfiles for python:3.8-slim and nvidia/cuda:10.2-devel-ubuntu18.04; note how the latter builds on top of two other Dockerfiles in a row.
Still it’s 143 lines for python, versus about 60 for CUDA, so let’s embed the 3 Dockerfiles for the latter on top of the former.
Finally, numba can be installed by simply using pip.
Have a look at the Dockerfile:
FROM python:3.8-slim

##### START NVIDIA CUDA DOCKERFILES ####
#LABEL maintainer "NVIDIA CORPORATION <cudatools@nvidia.com>"
RUN apt-get update && apt-get install -y --no-install-recommends \
    gnupg2 curl ca-certificates && \
    curl -fsSL https://developer.download.nvidia.com/compute/cuda/repos/ubuntu1804/x86_64/7fa2af80.pub | apt-key add - && \
    echo "deb https://developer.download.nvidia.com/compute/cuda/repos/ubuntu1804/x86_64 /" > /etc/apt/sources.list.d/cuda.list && \
    echo "deb https://developer.download.nvidia.com/compute/machine-learning/repos/ubuntu1804/x86_64 /" > /etc/apt/sources.list.d/nvidia-ml.list && \
    apt-get purge --autoremove -y curl \
    && rm -rf /var/lib/apt/lists/*

ENV CUDA_VERSION 10.2.89
ENV CUDA_PKG_VERSION 10-2=$CUDA_VERSION-1

# For libraries in the cuda-compat-* package: https://docs.nvidia.com/cuda/eula/index.html#attachment-a
RUN apt-get update && apt-get install -y --no-install-recommends \
    cuda-cudart-$CUDA_PKG_VERSION \
    cuda-compat-10-2 \
    && ln -s cuda-10.2 /usr/local/cuda && \
    rm -rf /var/lib/apt/lists/*

# Required for nvidia-docker v1
RUN echo "/usr/local/nvidia/lib" >> /etc/ld.so.conf.d/nvidia.conf && \
    echo "/usr/local/nvidia/lib64" >> /etc/ld.so.conf.d/nvidia.conf

ENV PATH /usr/local/nvidia/bin:/usr/local/cuda/bin:${PATH}
ENV LD_LIBRARY_PATH /usr/local/nvidia/lib:/usr/local/nvidia/lib64

# nvidia-container-runtime
ENV NVIDIA_VISIBLE_DEVICES all
ENV NVIDIA_DRIVER_CAPABILITIES compute,utility
ENV NVIDIA_REQUIRE_CUDA "cuda>=10.2 brand=tesla,driver>=396,driver<397 brand=tesla,driver>=410,driver<411 brand=tesla,driver>=418,driver<419 brand=tesla,driver>=440,driver<441"

ENV NCCL_VERSION 2.7.8

RUN apt-get update && apt-get install -y --no-install-recommends \
    cuda-libraries-$CUDA_PKG_VERSION \
    cuda-npp-$CUDA_PKG_VERSION \
    cuda-nvtx-$CUDA_PKG_VERSION \
    libcublas10=10.2.2.89-1 \
    libnccl2=$NCCL_VERSION-1+cuda10.2 \
    && apt-mark hold libnccl2 \
    && rm -rf /var/lib/apt/lists/*

RUN apt-get update && apt-get install -y --no-install-recommends \
    cuda-nvml-dev-$CUDA_PKG_VERSION \
    cuda-command-line-tools-$CUDA_PKG_VERSION \
    cuda-nvprof-$CUDA_PKG_VERSION \
    cuda-npp-dev-$CUDA_PKG_VERSION \
    cuda-libraries-dev-$CUDA_PKG_VERSION \
    cuda-minimal-build-$CUDA_PKG_VERSION \
    libcublas-dev=10.2.2.89-1 \
    libnccl-dev=2.7.8-1+cuda10.2 \
    && apt-mark hold libnccl-dev \
    && rm -rf /var/lib/apt/lists/*

ENV LIBRARY_PATH /usr/local/cuda/lib64/stubs

##### END   NVIDIA CUDA DOCKERFILES ####

ARG REQ_FILE="requirements-3sep.txt"
ADD requirements.in /
ADD $REQ_FILE /requirements.txt
RUN pip --no-cache-dir install --no-deps -r /requirements.txt

CMD [ "/bin/bash" ]
Here we’re following the process we depicted in the previous episode to specify pip requirements in a reproducible way.
In particular, requirements.in just contains numba. Then, requirements-3sep.txt ends up as follows:
#
# This file is autogenerated by pip-compile
# To update, run:
#
#    pip-compile --output-file=requirements-3sep.txt requirements.in
#
llvmlite==0.34.0          # via numba
numba==0.51.1             # via -r requirements.in
numpy==1.19.1             # via numba

# The following packages are considered to be unsafe in a requirements file:
# setuptools
Let’s build the container:
$ docker build -t cu:1 -f Dockerfile .
.. convert it to singularity:
$ singularity pull docker-daemon:cu:1
.. and transfer it to Topaz, the GPU cluster at Pawsey. Here we can start an interactive Slurm session:
$ salloc -n 1 --gres=gpu:1 -p gpuq-dev -t 10:00
And give a go to the add-cuda-numba.py sample script:
$ srun singularity exec -e cu_1.sif python3 add-cuda-numba.py
[..]

numba.cuda.cudadrv.error.CudaSupportError: Error at driver init:

CUDA driver library cannot be found.
If you are sure that a CUDA driver is installed,
try setting environment variable NUMBA_CUDA_DRIVER
with the file path of the CUDA driver shared library.
:
srun: error: t021: task 0: Exited with exit code 1
Oops, we forgot the --nv flag ..
NOTE: this bit requires a GPU-equipped system to work
$ srun singularity exec -e --nv cu_1.sif python3 add-cuda-numba.py[ 0. 3. 6. 9. 12. 15. 18. 21. 24. 27.]Good!
exitthe Slurm interactive allocation when done.
Intel Python: the astropy example
Intel develops and maintain a Python framework with optimisations for Intel CPUs. This include MKL accelerated numpy and scipy, DAAL accelerated scikit-learn and more.
This framework is available for free both with conda and as a container image; you can also look at the Dockerfile.
Let’s get back to our astropy example from the previous episode; as this package depends on numpy, let’s see how we can leverage Intel optimised Python (files under 3.intelpy/).
The intelpython container images make use of conda.
Following our best practices on conda containers from the previous episode, we have a requirements.in file specifying astropy==3.2.3, from which we’ve derived a detailed requirements-3sep.yaml (about 70 dependencies, see file in the active directory).
Then the Dockerfile ends up looking like:
FROM intelpython/intelpython3_core:2020.2
# Note: these python images are based on Debian (as of 27 August 2020, Debian 10 Buster)

ENV CONDA_PREFIX="/opt/conda"

ARG REQ_FILE="requirements-3sep.yaml"
ADD requirements.in /
ADD $REQ_FILE /requirements.yaml
RUN conda install -y --no-deps --file /requirements.yaml \
      && conda clean -ay
We can build the container image with:
$ docker build -t i:1 -f Dockerfile .
Intel provides some performance figures against a standard installation.
Also, you can use publicly available benchmark suites to assess performance yourself, for instance the iBench suite, again by Intel. Or you can write your own benchmark code based on your practical user case.
At Pawsey, we were able to confirm performance gains by testing linear algebra, FFT and machine learning benchmarks on Magnus and Zeus.
Pawsey Python base images
At Pawsey, we’ve recently added support for a set of base images for Python in HPC.
The images themselves are a useful starting point for building your custom Python container images.
In addition, the corresponding Dockerfiles offer a showcase of how to install Python packages in containers, in compliance with high-performance requirements.
Key Points