Introduction to Docker
Overview
Teaching: 25 min
Exercises: 5 minQuestions
Objectives
Learn how to download and run images
Docker Containers
Docker is a tool that allows you to easily create, deploy, and run applications on any architecture. It does this via something called containers, which is a way for you to package up an application and all of its dependecies, into a single object that’s easy to track, manage, share, and deploy.
Containers vs Virtual Machines
Many of you have probably used a VM, so you’re actually already familiar with some of the concepts of a container.
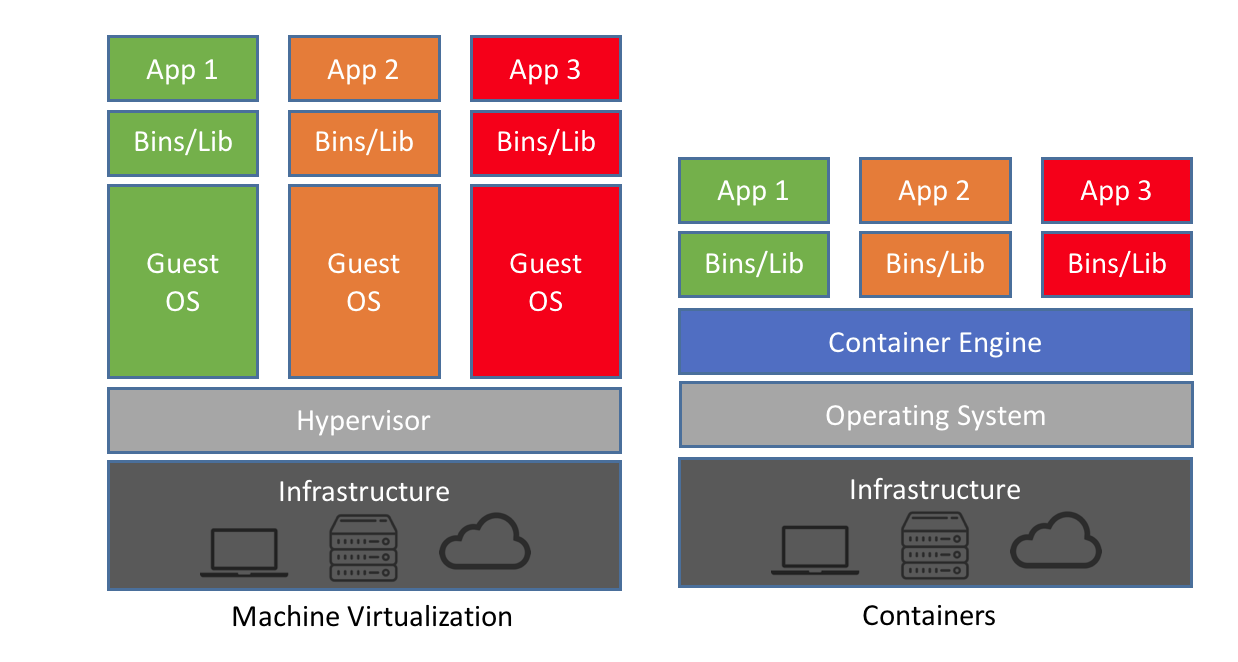
The key difference here is that VMs virtualise hardware while containers virtualise operating systems. There are other differences (and benefits)
- Containers are lighter weight (less CPU and memory usage, faster start-up times)
- More portable
- Modular (can easily combine multiple containers that work together)
Terminology
An image is a file (or set of files) that contains the application and all its dependencies, libraries, run-time systems, etc. required to run. You can copy images around, upload them, download them etc.
A container is an instantiation of an image. That is, it’s a process that Docker creates and starts up, and an image is run inside a container. You can run multiple containers from the same image, much like you might run the same application with different options or arguments.
In general, an image corresponds to a file, a container corresponds to a process.
A Dockerfile is a recipe to build an image.
A registry is a server application where images are stored and can be accessed by users. It can be public (e.g. Docker Hub) or private.
Containers and your workflow
There are a number of reasons for using containers in your daily work:
- Data reproducibility/provenance
- Cross-platform portability
- Simplified collaboration
- Simplified software dependencies and management
- Scalability
- Provide a consistent testing environment
A few examples of how containers are being used at Pawsey
- Bioinformatics workflows
- RStudio & JupyterHub
- Machine Learning
- Python apps in radio astronomy
- Webservers
- Cloud workflows (via Docker)
- HPC workflows (via Shifter)
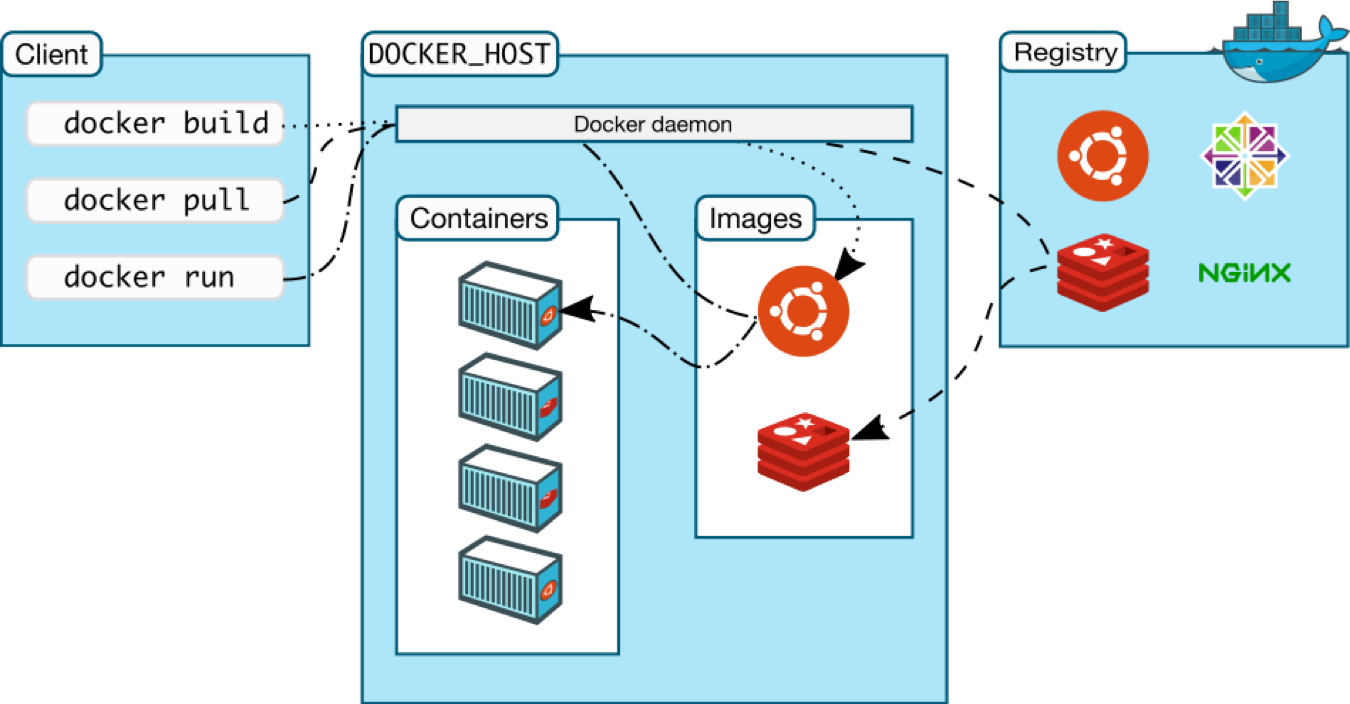
Here’s an overview of what a workflow might look like:
A word of warning: sudo
Docker requires
sudo, i.e.root, privileges to be used. The major implication is that commands and applications have the potential to damage the host operating system and filesystem, with no root password required. By default, no host directory is visible inside containers, which greatly reduces chances of harm. In a subsequent episode we’ll see how to selectively map host directories to the container for input/output.A second consequence is that if you’re running on a computer where you have limited user permissions (i.e. university/corporate computers), you might have troubles in running Docker, or even installing it. If this happens, you will need to get in touch with your IT services to figure out a workable solution.
Third, to run Docker commands with
rootprivileges on a Linux box, you will need to prepend them withsudo. There’s a three-step procedure to follow if you want to avoid having to typesudoall the time (again, you might need IT support). See instructions at Manage Docker as a non-root user.Always keep in mind that any Docker action is run as root!
Running a simple command in a container
Let’s run a simple command:
$ docker run ubuntu cat /etc/os-release
Unable to find image 'ubuntu:latest' locally
latest: Pulling from library/ubuntu
898c46f3b1a1: Pull complete
63366dfa0a50: Pull complete
041d4cd74a92: Pull complete
6e1bee0f8701: Pull complete
Digest: sha256:017eef0b616011647b269b5c65826e2e2ebddbe5d1f8c1e56b3599fb14fabec8
Status: Downloaded newer image for ubuntu:latest

NAME="Ubuntu"
VERSION="18.04.2 LTS (Bionic Beaver)"
ID=ubuntu
ID_LIKE=debian
PRETTY_NAME="Ubuntu 18.04.2 LTS"
VERSION_ID="18.04"
HOME_URL="https://www.ubuntu.com/"
SUPPORT_URL="https://help.ubuntu.com/"
BUG_REPORT_URL="https://bugs.launchpad.net/ubuntu/"
PRIVACY_POLICY_URL="https://www.ubuntu.com/legal/terms-and-policies/privacy-policy"
VERSION_CODENAME=bionic
UBUNTU_CODENAME=bionic
Here’s what we’ve done:
- Downloaded an Ubuntu Docker image (this wouldn’t happen if the image had been downloaded previously)
- Created a container from our Ubuntu image
- The command we’ve run inside the Ubuntu container is
cat /etc/os-release, which simply prints some info about the operating system
Docker images have a name and a tag. The default for the tag is ‘latest’, and can be omitted (but be careful…more on this later). If you ask docker to run an image that is not present on your system, it will download it from Docker Hub first, then run it.
Most Linux distributions have pre-built images available on Docker Hub, so you can readily find something to get you started. Let’s start with the official Ubuntu linux image, and run a simple ‘hello world’. The docker run command takes options first, then the image name, then the command and arguments to run follow it on the command line:
Note in our example Docker uses the ‘ubuntu:latest’ tag, since we didn’t specify what version we want. We can specify a specific version of ubuntu like this:
$ docker run ubuntu:17.04 cat /etc/os-release
NAME="Ubuntu"
VERSION="17.04 (Zesty Zapus)"
ID=ubuntu
ID_LIKE=debian
PRETTY_NAME="Ubuntu 17.04"
VERSION_ID="17.04"
HOME_URL="https://www.ubuntu.com/"
SUPPORT_URL="https://help.ubuntu.com/"
BUG_REPORT_URL="https://bugs.launchpad.net/ubuntu/"
PRIVACY_POLICY_URL="https://www.ubuntu.com/legal/terms-and-policies/privacy-policy"
VERSION_CODENAME=zesty
UBUNTU_CODENAME=zesty
Docker caches images on your local disk, so the next time you need to run your container it will be faster:
$ docker run ubuntu /bin/echo 'hello world'
hello world
You can list all Docker containers on your system with
$ docker ps -a
The -a (or --all) flag prints all containers, i.e. those currently running and any stopped containers.
Similarly, you can list all docker images you have with
$ docker images
In the example above, Docker automatically downloaded the Ubuntu image. If you want to explicity download an image, you can use the docker pull command:
$ docker pull ubuntu
Another handy Docker command line option is docker search. You can use it to quickly search for available images on Docker Hub. Note that you may still want to visit the Docker Hub webpage to find out more information about a particular image (e.g. run commands, configuration instructions, etc.).
$ docker search tensorflow
NAME                                DESCRIPTION                                     STARS               OFFICIAL            AUTOMATED
tensorflow/tensorflow               Official Docker images for the machine learn…   1236
jupyter/tensorflow-notebook         Jupyter Notebook Scientific Python Stack w/ …   100
xblaster/tensorflow-jupyter         Dockerized Jupyter with tensorflow              52                                      [OK]
tensorflow/serving                  Official images for TensorFlow Serving (http…   31
floydhub/tensorflow                 tensorflow                                      15                                      [OK]
bitnami/tensorflow-serving          Bitnami Docker Image for TensorFlow Serving     13                                      [OK]
opensciencegrid/tensorflow-gpu      TensorFlow GPU set up for OSG                   7
tensorflow/tf_grpc_server           Server for TensorFlow GRPC Distributed Runti…   7
hytssk/tensorflow                   tensorflow image with matplotlib.pyplot.imsh…   3                                       [OK]
tensorflow/tf_grpc_test_server      Testing server for GRPC-based distributed ru…   3
mikebirdgeneau/r-tensorflow         RStudio and Tensorflow                          2                                       [OK]
lablup/kernel-python-tensorflow     TensorFlow container imager for Backend.Ai      2
bitnami/tensorflow-inception        Bitnami Docker Image for TensorFlow Inception   2                                       [OK]
Running an interactive command in an image
Docker has the option to run containers interactively. While this is convenient (and useful for debugging), in general you shouldn’t use this model as your standard way of working with containers. To run interactively, we just need to use the -i and -t flags, or -it for brevity:
$ docker run -i -t ubuntu /bin/bash
root@c69d6f8d89bd:/# id
uid=0(root) gid=0(root) groups=0(root)
root@c69d6f8d89bd:/# ls
bin   dev  home  lib64  mnt  proc  run   srv  tmp  var
boot  etc  lib   media  opt  root  sbin  sys  usr
root@c69d6f8d89bd:/# exit # or hit CTRL-D
The -t and -i options make sure we allocate a terminal to the container, and keep its STDIN (standard input) open.
As you can see, you have root access in your container, and you are in what looks like a normal linux system. Now you can do whatever you like, e.g. install software and develop applications, all within the container of your choice.
Pull and run a Python Miniconda container
How would you pull the following container image,
continuumio/miniconda3:4.5.12?Once you’ve pulled it, enquire the Python version inside the container by running
python --version.Finally, open and then close an interactive Python console through the container.
Solution
Pull:
$ docker pull continuumio/miniconda3:4.5.12Get Python version:
$ docker run continuumio/miniconda3:4.5.12 python --versionOpen and close an interactive console:
$ docker run -it continuumio/miniconda3:4.5.12 python
{: .bash}
>>> exit # or hit CTRL-D
Best practices
- Prefer official images over those built by third-parties. Docker runs with privileges, so you have to be a bit careful what you run
- Good online documentation on Docker commands can be found at Docker run reference and related pages
Key Points
You’ve learned some basic Docker commands for running, downloading, and searching for docker images
docker runfor running images (add-itfor interactive mode)
docker pullfor downloading images
docker searchfor searching imagesOther useful commands to list current images and containers are
docker imagesanddocker ps -a