Build your own container image with Docker
Overview
Teaching: 20 min
Exercises: 10 minQuestions
Objectives
Learn what is a Dockerfile and its basic syntax
Learn how to build a container and push it to a web registry
What is a Dockerfile?
A Dockerfile is a recipe to build an image. It is a collection of the standard shell commands you would use to build your software through prompt; in addition, it contains Docker-specific instructions that handle the build process. We will see some examples below.
Let’s write a Dockerfile
We’ll build up to a more complicated image, but for now we’ll start with a basic Ubuntu Linux image and install some compilers and other common linux utilities.
To begin, cd to the 05_build_intro demo directory:
$ cd <top-level>/demos/05_build_intro
Now use your favourite text editor to create a file named Dockerfile and add the following:
FROM ubuntu:18.04

MAINTAINER Your Name <youremail@yourdomain>

RUN apt-get update && \
    apt-get install -y \
        build-essential \
        git \
        wget \
    && apt-get clean all \
    && rm -rf /var/lib/apt/lists/*

CMD ["/bin/bash"]
FROM: compulsory, it provides the starting image we will use to build our customised one;MAINTAINER: details of the person who wrote the Dockerfile, optional;RUN: this is the most used instruction, that alllows to run most shell commands during the build. MultipleRUNinstructions are often found in a single Dockerfile;CMD: specifies the default command to be executed with the container.bashis the default anyway for Ubuntu containers, but it’s good to be aware of this syntax.
Building the image
Once the Dockerfile is ready, let us build the image with docker build (we’ll name it supernova for a later purpose):
$ docker build -t supernova .
Sending build context to Docker daemon  2.048kB
Step 1/4 : FROM ubuntu:18.04
18.04: Pulling from library/ubuntu
Digest: sha256:9b1702dcfe32c873a770a32cfd306dd7fc1c4fd134adfb783db68defc8894b3c
Status: Downloaded newer image for ubuntu:18.04
 ---> 4c108a37151f
[..]
Step 4/4 : CMD ["/bin/bash"]
 ---> Running in 50bf59fd7477
Removing intermediate container 50bf59fd7477
 ---> ff79d520ab57
Successfully built ff79d520ab57
Successfully tagged supernova:latest
In the command above, . indicates to Docker that everything it needs to build the image is located in the current directory (this is known as the build context). Docker will assume there is a file named Dockerfile,
but it’s possible to specify a filename if you want (e.g. docker build -f MyDockerfile .)
The -t flag is used to specify the image name (compulsory) and tag (optional). As we haven’t tagged our image, Docker automatically assigns it the latest tag. We’ll tag our image later, as it’s good practice to
track and manage different versions of your images.
Layers in a container image
Note how the RUN instruction above is used to execute a sequence of commands to:
- update the list of available packages
- install a set of Linux packages
- clean build directories
We have concatenated all these commands in one using the && linux operator, and then the \ symbol to break them into multiple lines for readability.
We could have used one RUN instruction per command, so why concatenating instead?
Well, each RUN creates a distinct layer in the final image, increasing its size. It is a good practice to use as few layers, and thus RUN instructions, as possible, to keep the image size smaller.
More Dockerfile instructions
Several other instructions are available, that we haven’t covered in this introduction. You can find more information on them at Dockerfile reference. Just to mention a few possibilities:
ARG: set temporary values that will be used during the build process, and that might need to be changed in future builds; a common use is to specify package versions;docker buildhas an option to change at build time the value of temporaryARGvariables set in the Dockerfile:--build-arg <variable>=<value>;ENV: set environment variables that will persist at runtime in the container; DO NOT useRUN export <..>to this end, as the variable will be lost after theRUNstep is completed;ADD/COPY: embed files/directories from your computer into the container image;EXPOSE: make the container listen on specified network ports;CMD/ENTRYPOINT: tweak the default behaviour of the executing container;USER: switch user.
Pushing the image to Docker Hub
If you have a (free) Docker Hub account you must first login to Docker.
$ docker login
You are now ready to push your newly created image to the Docker Hub web registry.
First, let us create a second tag for the image, that includes your Docker Account. To this end we’ll use docker tag:
$ docker tag supernova:1.0 <your-dockerhub-account>/supernova:1.0
Now we can push the image:
$ docker push <your-dockerhub-account>/supernova:1.0
The push refers to repository [docker.io/bskjerven/supernova]
cab15c00fd34: Pushed
cf5522ba3624: Pushed
[..]
1.0: digest: sha256:bcb0e09927291c7a36a37ee686aa870939ab6c2cee2ef06ae4e742dba4bb1dd4 size: 1569
Congratulations! Your image is now publicly available for anyone to pull.
Building a De Novo Assembly Image
Now let’s try building a real image. We’ll create an image for the de novo assembly tool, Supernova, from 10x Genomics. We’ll use the same Dockerfile as before, but add some commands to download and install the Supernova software:
FROM ubuntu:18.04

RUN apt-get update && \
    apt-get install -y \
        build-essential \
        git \
        wget \
    && apt-get clean all \
    && rm -rf /var/lib/apt/lists/*

WORKDIR /opt

RUN wget -O supernova-2.1.1.tar.gz \
      "http://cf.10xgenomics.com/releases/assembly/supernova-2.1.1.tar.gz?Expires=1561979120&Policy=eyJTdGF0ZW1lbnQiOlt7IlJlc291cmNlIjoiaHR0cDovL2NmLjEweGdlbm9taWNzLmNvbS9yZWxlYXNlcy9hc3NlbWJseS9zdXBlcm5vdmEtMi4xLjEudGFyLmd6IiwiQ29uZGl0aW9uIjp7IkRhdGVMZXNzVGhhbiI6eyJBV1M6RXBvY2hUaW1lIjoxNTYxOTc5MTIwfX19XX0_&Signature=YLbLl4BRup5H-lvtBdZl9ipIJfkERELF5E9kkEsnjwesw0XT8Mf9RQ4kp8k9ngOc8x10IdG1EIq~NZQtkW~XVRnLCdO3JXbanp~k-ROXqO-GWfBJJ5maY2A4XrB1TsTvBe-cUSUQkr~DsqLlga3ZP8KvmurRArj0acAYmXJnoxpnwPNCEQA59tRlZyTvkU9wpCJfZpBp6PJVXx~AX0OZmmFdMeAIdtuYp388UJar-yfWbSHD832Ci3V~a1A2rIoY~fqi8hNxpBOjqrfj-dDhSQg0vPskiV2LAwWblSPScIFdS7lPsb67U~ABdAalnYYSHkTAgARlFVkUHpg45rxklQ__&Key-Pair-Id=APKAI7S6A5RYOXBWRPDA" \
      && tar xf supernova-2.1.1.tar.gz \
      && rm -rf supernova-2.1.1.tar.gz

ENV PATH="/opt/supernova-2.1.1:${PATH}"

WORKDIR /
After installing software via apt-get we use the WORKDIR instruction to set our working directory to /opt inside the image. This is equivalent to running mkdir /opt; cd /opt, but we don’t need to use a RUN directive. It also means all subsusquent
Docker commands command will execute in /opt unless we specify otherwise.
The RUN wget -O supernova-2.1.1.tar.gz section downloads the Supernova code from 10x, untars it, and then removes the archived file. 10x requires us to register to download the software, and then generates the long authentication you see in the
download link.
After downloading and untarring we need to upate the PATH environment variable so we can use Supernova. We can use the ENV directive to update the images environment variables.
Finally, we set the final working directory to /.
We can now build and tag this image (this will take a few minutes):
$ docker build -t supernova:2.1.1 .
Sending build context to Docker daemon  3.584kB
Step 1/5 : FROM ubuntu:18.04
 ---> 4c108a37151f
...
Removing intermediate container dd8f97a79085
 ---> 4a1ebcb33087
Step 5/5 : ENV PATH="/opt/supernova-2.1.1:${PATH}"
 ---> Running in 2515194a953b
Removing intermediate container 2515194a953b
 ---> e3b912a7329a
Successfully built e3b912a7329a
Successfully tagged supernova:2.1.1
Running Supernova
We’ll run a small, built-in test example and access it via a web browser:
$ docker run -d -p 80:3600 --name=supernova supernova:2.1.1 supernova testrun --id=tiny --localcores=4 --uiport=3600
Recall the Docker options -d (run in the background) and -p 80:3600 (mapping ports between the host & the container). Supernova has a built-in testrun function, and we pass the name of the dataset we want to use, --id=tiny.
Supernova also lets us specify compute resources to use (--localcores=4) and what port the web UI should be served on (--uiport=3600, this needs to match what we specify in the Docker port mapping option).
Once that starts we can query the running container to find out how to access the web UI:
$ docker logs supernova
supernova testrun (2.1.1)
Copyright (c) 2018 10x Genomics, Inc.  All rights reserved.
-------------------------------------------------------------------------------

Running Supernova in test mode...

Martian Runtime - '2.1.1-v2.3.3'
Serving UI at http://20aa3af2bc1d:3600?auth=ORqTR6Zd7Df-amLz2ExKd3hotS6dPwO919bQkr7jWQs

Running preflight checks (please wait)...
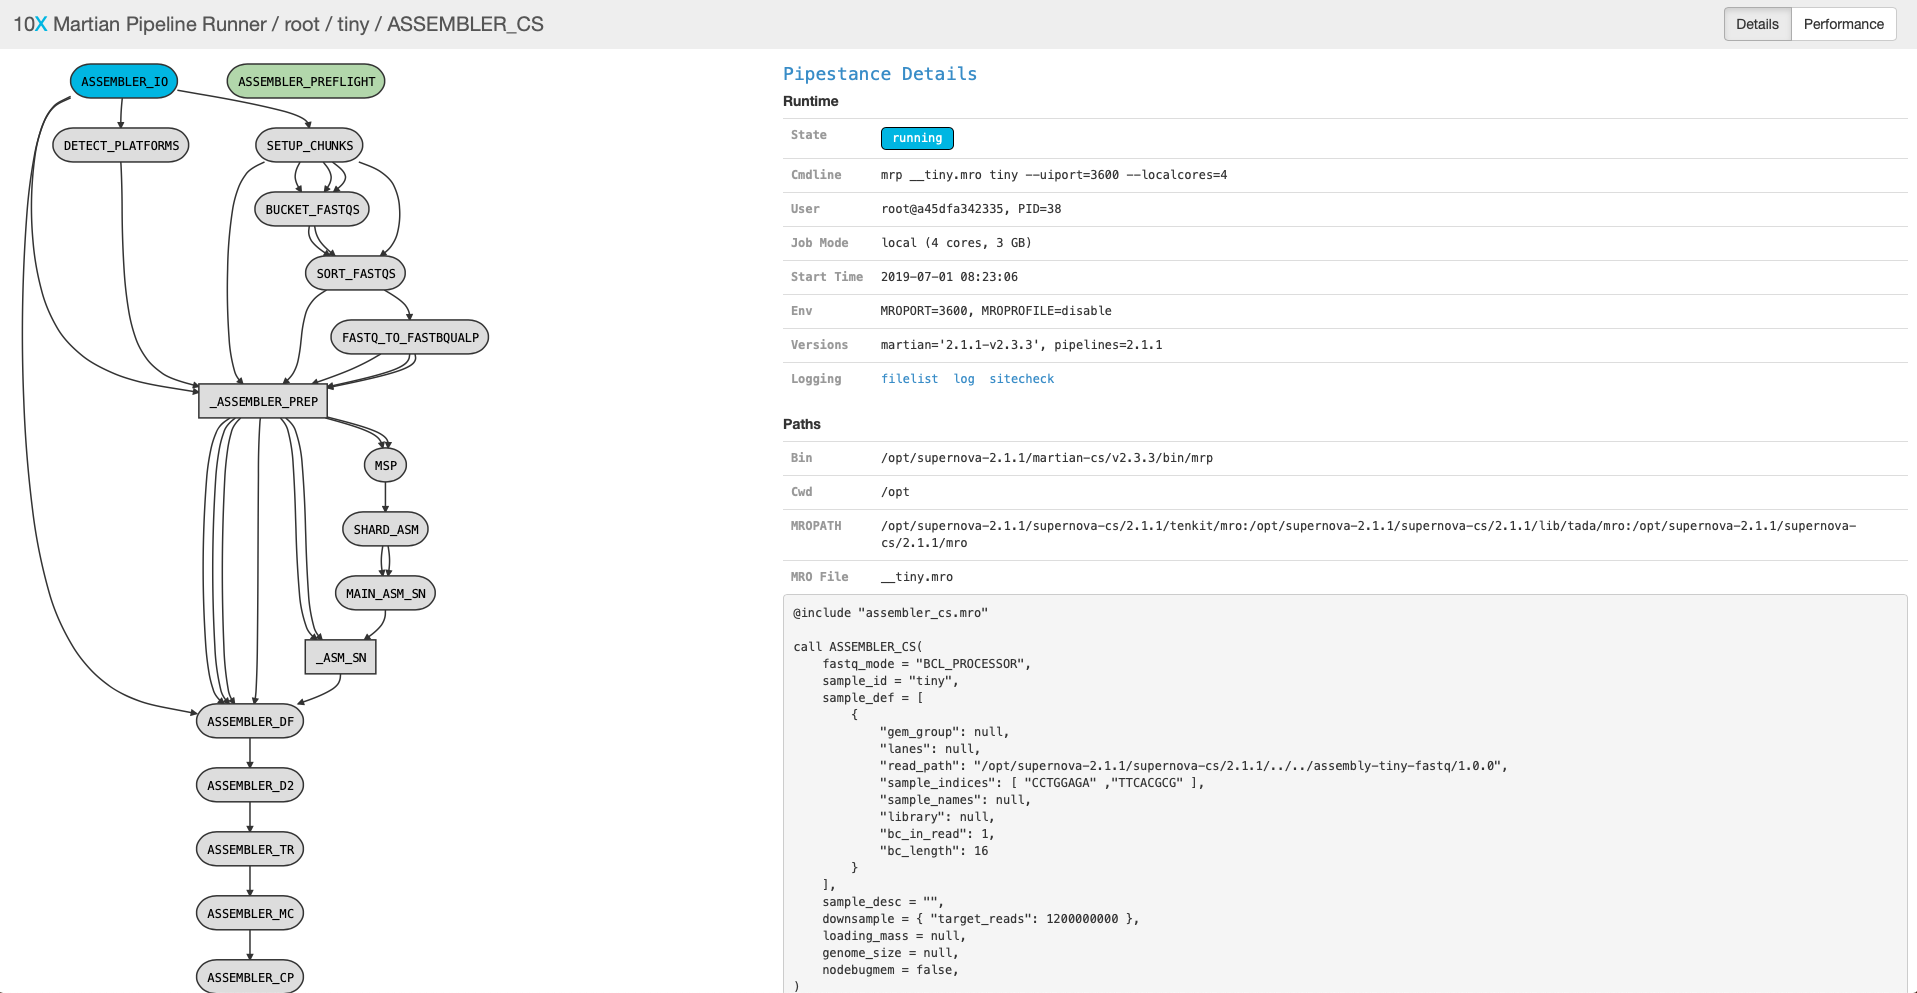
That website is using a hostname internal to the container; we need to open up http://localhost but use the same port and auth key:
http://localhost:3600?auth=ORqTR6Zd7Df-amLz2ExKd3hotS6dPwO919bQkr7jWQs
Note that your auth key will be different from the above one. You should then see an overview of the pipeline like this:
This will take a while to run, and we need to use the port for other examples. To stop your Supernova container:
$ docker stop supernova
$ docker rm supernova
Base images for Python
It’s often not necessary to build an entire application from bare bones, as there are numerous general purpose images that can be used as starting point.
continuumio/miniconda2 and continuumio/miniconda3 are Docker images provided by the maintainers of the Anaconda project. They ship with Python 2 and 3, respectively, as well as pip and conda to install and manage packages. At the time of writing, the most recent version is 4.5.12, which is based on Python 2.7.15 and 3.7.1, respectively.
Among other use cases, these base images can be very useful for maintaining Python containers, as well as bioinformatics containers based on the Bioconda project.
If you need interactive Jupyter Notebooks, Jupyter Docker Stacks are a series of dedicated container images. Among others, there is the base SciPy image jupyter/scipy-notebook, the data science image jupyter/datascience-notebook, and the machine learning image jupyter/tensorflow-notebook.
Base images for R
The Rocker Project maintains a number of good R base images. Of particular relevance is rocker/tidyverse, which embeds the basic R distribution, an RStudio web-server installation and the tydiverse collection of packages for data science, that are also quite popular across the bioinformatics community of Bioconductor. At the time of writing, the most recent version is 3.5.3.
Other more basic images are rocker/r-ver (R only) and rocker/rstudio (R + RStudio).
Best practices
- for stand-alone packages, it is suggested to use the policy of one container per package
- for Python or R pipelines, it may be handier to use the policy of a single container for the entire pipeline
- Best practices for writing Dockerfiles are found in the Docker website
Key Points
A Dockerfile is a recipe that uses specific instructions to direct the image building process
docker buildis used to build images
docker pushis used to push images to a web registry