Session 1: containerising a pipeline
Overview
Teaching: 10 min
Exercises: 50 minQuestions
Objectives
Get ready for the session
By now, you’ll be connected to the Nimbus VM you got assigned to.
First thing, we need to download the workshop materials from Github:
$ cd /data
$ git clone https://github.com/PawseySC/containers-bioinformatics-workshop.git
$ cd containers-bioinformatics-workshop
$ export WORK=$(pwd)
To save you some potentially long download times, we have cached for you most of the container images required by this workshop; this will greatly reduce waiting times when you execute the singularity pull commands in this workshop.
Use at least two terminal tabs
We advise you to open at least two terminal tabs, and connect to the VM from both of them. In this way, you can use one to edit files, and one to execute commands, thus making your workflow more efficient.
Goals
In this first session, we’re going to port a small RNA sequencing pipeline to containers. This is based on the RNAseq-NF repository by the Nextflow developers.
Here is a graphical representation:
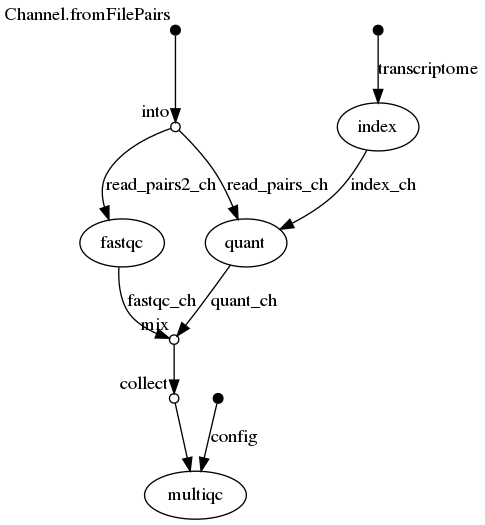
The pipeline uses three tools, salmon, fastqc and multiqc.
By containerising it, we’re going to apply some skills we learnt about during the webinars, namely:
- search for container images on web registries;
- download images with
singularity pull <IMAGE> - execute commands in containers through
singularity exec <IMAGE> <CMD> <ARGS> - bind mount additional host directories using either
- execution flag
-B - environment variable
SINGULARITY_BINDPATH
- execution flag
If you need to brush up on these concepts, have a look at these webinar episodes:
Towards the end, we’re going to build on these concepts, and see how we can eventually simplify the user experience with containerised packages.
GUIDED - Get the container images ready
Let’s cd in the directory for this exercise:
$ cd exercises/pipeline/data
and have a look at the pipeline:
$ cat original_pipe.sh
#!/bin/bash

echo "Pipeline started..."

# step 1
cd ../reference
# ONLY CHANGE THE NEXT LINE - EXECUTION LINE
salmon index -t ggal_1_48850000_49020000.Ggal71.500bpflank.fa -i out_index &>log_index
cd ../data
echo " indexing completed"

# step 2
# ONLY CHANGE THE NEXT LINE - EXECUTION LINE
salmon quant --libType=U -i ../reference/out_index -1 ggal_gut_1.fq -2 ggal_gut_2.fq -o ggal_gut &>log_quant
echo " quantification completed"

# step 3
mkdir out_fastqc
# ONLY CHANGE THE NEXT LINE - EXECUTION LINE
fastqc -o out_fastqc -f fastq -q ggal_gut_1.fq ggal_gut_2.fq &>log_fq
echo " quality control completed"

# step 4
mkdir out_multiqc
cd out_multiqc
ln -s ../ggal_gut .
ln -s ../out_fastqc .
# ONLY CHANGE THE NEXT LINE - EXECUTION LINE
multiqc -v . &>../log_mq
cd ..
echo " multiple quality control completed"

echo "Pipeline finished!"
You can see there’s some printing here are there using echo, to monitor the progress at runtime.
Some housekeeping is also being done, such as changing directories and creating output directories.
The key execution lines are just four though, and make use of three packages (let’s stick to these versions, they have been tested for this session, and proven to work):
- salmon 1.2.1
- fastqc 0.11.9
- multiqc 1.9
Our first task is to look for container images for this pipeline. For each package, we’re going to use the most recent image available in the registry. Let’s discuss in detail the case of Salmon.
Find a container image for Salmon
Today we’re using the web registry Quay, at https://quay.io, to search the images we need. This registry contains all the images provided by the BioContainers project, so there are good chances of finding what we need here. We could have gone directly at the BioContainers home page, https://biocontainers.pro, however its user interface is a bit less friendly right now.
Now let’s try and find the most recent container image for Salmon version 1.2.1 by BioContainers, using the Quay web site.
Solution
- Type
salmonin the Search field on the top right of the page; in alternative, use the Explore button at the top;- In the results list, look for
biocontainers/salmonand click on it;- Click on the Tags icon on the left, and locate the most recent one for version 1.2.1 at the top of the list; it should be
1.2.1--hf69c8f4_0;- Click on the Fetch icon at the rightmost side of the record, select Pull by Tag, and then select and copy to clipboard the string starting with
quay.io/, i.e.quay.io/biocontainers/salmon:1.2.1--hf69c8f4_0.
Pull the container image for Salmon
To this end let’s use the appropriate
singularitycommand.Solution
$ singularity pull docker://quay.io/biocontainers/salmon:1.2.1--hf69c8f4_0At the end an image SIF file for Salmon is downloaded:
$ ls salmon*salmon_1.2.1--hf69c8f4_0.sif
Find and pull images for FastQC and MultiQC
To save time, we won’t browse Quay for these other two images.
Here are the two images repositories you need:docker://quay.io/biocontainers/fastqc:0.11.9--0 docker://quay.io/biocontainers/multiqc:1.9--pyh9f0ad1d_0Can you download them with Singularity?
Solution
$ singularity pull docker://quay.io/biocontainers/fastqc:0.11.9--0
$ singularity pull docker://quay.io/biocontainers/multiqc:1.9--pyh9f0ad1d_0
SIF images in your current directory
We’re in
$WORK/exercises/pipeline/data.Right now we should have these three images in it, together with the inputs and scripts for the pipeline:
Output
$ lsclean_outputs.sh images.sh solutions fastqc_0.11.9--0.sif multiqc_1.9--pyh9f0ad1d_0.sif wrappers ggal_gut_1.fq original_pipe.sh ggal_gut_2.fq salmon_1.2.1--hf69c8f4_0.sif
GUIDED - Test that the downloaded images work
It is a good practice to check whether the applications in the container images you download actually work.
This can range from testing whether the help output can be displayed, to running small input cases.
In this context, to save time you’ll just test ONE image, by running an application of your choice with the --help flag, e.g.. multiqc --help.
Example: multiqc
Solution
$ singularity exec ./multiqc_1.9--pyh9f0ad1d_0.sif multiqc --help
ROOM - Containerise the pipeline - first pass
Now it’s your time to work a bit with Singularity!
Make a copy of the original pipeline to work with:
$ cp original_pipe.sh pipe.1.sh
At first, you will need to modify ONLY FOUR LINES of this file. Do not change anything else, nor move files around in the directory structure.
Hints
- add
singularitysyntax to execute those four commands using the appropriate containers you downloaded; - the current directory is mounted by default in the container;
- if you need other directories, however… (to bind mount use the execution flag approach for now, not the environment variable);
- if you want to go in stages, you can temporarily add an
exitcommand in the script after the pipeline step you’re working on, to avoid errors at the upcoming steps (that are not yet containerised); - if you need to clean up the outputs in the work directories to perform further tests, you can use the provided script
clean_outputs.sh; - if you are lost, ask the trainers or your peers.
Step 1 - salmon index
Only the relevant edited line is reported.
Backslashes\and newlines are used for the sake of readability of the code.Hint: look in the script for the current directory for this step; you’ll need to use an appropriate path for the container image.
Solution
singularity exec \
  ../data/salmon_1.2.1--hf69c8f4_0.sif \
  salmon index -t ggal_1_48850000_49020000.Ggal71.500bpflank.fa -i out_index &>log_index
Step 2 - salmon quant
Hint: where are the reference data compared to working directory of this step?
Solution
singularity exec \
  -B ../reference \
  ./salmon_1.2.1--hf69c8f4_0.sif \
  salmon quant --libType=U -i ../reference/out_index -1 ggal_gut_1.fq -2 ggal_gut_2.fq -o ggal_gut &>log_quant
Step 3 - fastqc
Solution
singularity exec \
  ./fastqc_0.11.9--0.sif \
  fastqc -o out_fastqc -f fastq -q ggal_gut_1.fq ggal_gut_2.fq &>log_fq
Step 4 - multiqc
Hint: where are the relevant input files/data compared to the current directory?
Solution
singularity exec \
  -B .. \
  ../multiqc_1.9--pyh9f0ad1d_0.sif \
  multiqc -v . &>../log_mq
Whenever you’re happy with your updated pipeline script, run it:
$ ./pipe.1.sh
It should take under a minute. If it runs to completion, among others you should have the output file out_multiqc/multiqc_report.html , about 1.2 MB in size:
$ ls -lh out_multiqc/multiqc_report.html
-rw-r--r-- 1 ubuntu ubuntu 1.2M Jun 8 13:01 out_multiqc/multiqc_report.html
ROOM - Containerise the pipeline - second pass
Now, let’s build from this first successful iteration of a containerised pipeline.
You’re going to edit it by making wider use of environment variables.
This will make the script tidier and more readable; some patterns might even pop up, that were not evident at first.
Let’s clean the outputs from the previous run:
$ ./clean_outputs.sh
and then make a new copy of the pipeline script (if you had troubles, you can pick it up from solutions/pipe.1.sh):
$ cp pipe.1.sh pipe.2.sh
Container image paths
At the beginning of the script, just after the shebang
#!/bin/bash, define variables for each of the three container images we’re using. Use absolute paths, for instance:salmon_image="$WORK/exercises/pipeline/data/salmon_1.2.1--hf69c8f4_0.sif"Then, use these variables at the lines where you use each container.
Solution
Only relevant pieces of code are shown:
#!/bin/bash

salmon_image="$WORK/exercises/pipeline/data/salmon_1.2.1--hf69c8f4_0.sif"
fastqc_image="$WORK/exercises/pipeline/data/fastqc_0.11.9--0.sif"
multiqc_image="$WORK/exercises/pipeline/data/multiqc_1.9--pyh9f0ad1d_0.sif"
[..]

singularity exec \
  $salmon_image \
[..]

singularity exec \
  -B ../reference \
  $salmon_image \
[..]

singularity exec \
  $fastqc_image \
[..]

singularity exec \
  -B .. \
  $multiqc_image \
[..]
Bind mounted directories
Can you think of a single, common host directory path to bind mount, that includes all of the required directories for the pipeline?
Now get rid of the occurrences of the
-Bflags at the execution lines.
In substitution, add an appropriate definition for the variableSINGULARITY_BINDPATHjust after the image paths definition at the beginning of the script. Use the common host path you have just identified.Solution
The path
$WORK/exercises/pipelinewill do the job.
Note that any parent directory of this one would work, too (just do not mount/, or the container will crash).#!/bin/bash salmon_image="$WORK/exercises/pipeline/data/salmon_1.2.1--hf69c8f4_0.sif" fastqc_image="$WORK/exercises/pipeline/data/fastqc_0.11.9--0.sif" multiqc_image="$WORK/exercises/pipeline/data/multiqc_1.9--pyh9f0ad1d_0.sif" export SINGULARITY_BINDPATH="$WORK/exercises/pipeline" [..] singularity exec \ $salmon_image \ [..] singularity exec \ $salmon_image \ [..] singularity exec \ $fastqc_image \ [..] singularity exec \ $multiqc_image \ [..]
Once again, you can test your modified pipeline with:
$ ./pipe.2.sh
And look for the output file out_multiqc/multiqc_report.html , about 1.2 MB in size.
If you had troubles, you can pick up the final pipeline script for this step from solutions/pipe.2.sh
ROOM - Questions for Reflection
These are a set of questions designed to kick off the discussion within your breakout room:
- Go back on the web browser, on https://quay.io, and look for, say, 3 packages you normally use in your research; can you find them within the
biocontainers/repository?- Look back at the two steps of containerisation you just went through. What was the most interesting learning outcome? Which was the hardest bit to digest?
- Look at the final containerised pipeline. Do you see any patterns in the way it looks compared to the original one?
- Right now, do you think using containers would save you time compared to building/installing research software yourself?
GUIDED - Streamlining the user experience of containers
Before proceeding, I can show you the content of the pipeline main output file, out_multiqc/multiqc_report.html, from my screen.
Now, in the last iteration of the containerised pipeline you might have noticed some patterns.
Indeed, each containerised command has the form:
singularity exec $image <COMMAND> <ARGUMENTS>
where the image variable is defined at the top of the script.
Could this become a sort of template for a bash script, that executes a command through a container, without us having to type the full syntax all the time?
Let’s take the example of salmon, and have a look at this script, that you can find at wrappers/salmon:
#!/bin/bash

image="$WORK/exercises/pipeline/data/salmon_1.2.1--hf69c8f4_0.sif"

cmd="salmon"
args="$@"

singularity exec $image $cmd $args
For clarity, we’re using variables to define each component of the template syntax we identified above.
Note how we’re defining the arguments variable, args, as having the value $@. This is the bash syntax representing the arguments of a script we’re calling. In practice, when we execute this script, any argument we put after the script name will be passed onto args.
We can use this script in substitution of the articulated singularity syntax we explored in the previous exercises.
Let’s give it a go!
The directory wrappers has scripts of this type for the three application commands we need. Each script name matches that of the corresponding command.
Let’s start again by cleaning the outputs from the previous run:
$ ./clean_outputs.sh
and then by making a copy of the original pipeline:
$ cp original_pipe.sh pipe.3.sh
Now, we’re going to only make two edits:
- defining the bind mount paths with
SINGULARITY_BINDPATH(as discussed in the previous step of this session); - include the
wrappersdirectory in the value of the bash variablePATH; this is used by bash to look for programs and scripts to execute.
We’re making these edits right at the beginning of the script:
#!/bin/bash

PATH="$WORK/exercises/pipeline/data/wrappers:$PATH"
export SINGULARITY_BINDPATH="$WORK/exercises/pipeline"

[..]
Let’s try it:
$ ./pipe.3.sh
After about a minute, the output file out_multiqc/multiqc_report.html will be there, about 1.2 MB in size.
That’s it! We’ve run a containerised pipeline, by using a script that almost looks like the original one. Most of the additional syntax for singularity is inside the wrapper scripts for each command.
Finally note that, for a single containerised application, you might need to create multiple wrapper scripts, one for each command that ships with that application (e.g. for BLAST you will have blastn, blastp and so on).
There are ways of further generalising this approach, that are beyond the scope of this session.
Key Points